1 About this Quickstart
This document describes how to install and work with the Linux Board Support Package (BSP) for the phyCORE-AM335x platform. This BSP provides a fundamental software platform for development, deployment and execution on the phyCORE-AM335x.
The Quickstart contains instructions for:
- Host Setup
- Board Setup
- Building a BSP (Platform, Kernel, Root Filesystem)
- Flashing images (MLO, Barebox, Kernel, Root Filesystem)
2 Host Setup
The phyCORE-AM335x (PCM-051) has been developed and tested with Ubuntu 10.04 LTS Lucid Lynx [Installation Guide]. Although it is possible to use a different OS, some setup information will contain OS-specific commands and paths for settings.
Update repositories and upgrade installed packages:
sudo apt-get update
sudo apt-get upgrade
2.1 Server Setup
Support for installing and setting up TFTP, NFS, and Samba server settings to enable communication between multiple systems and the target.
2.1.1 TFTP
TFTP allows files to be downloaded from one machine to another. With most embedded Linux devices, TFTP is an efficient way to boot the kernel during development so that the user does not have to flash a new kernel every time it is modified. It is also helpful when updating images in flash from Barebox.
First, start by installing the TFTP server.
sudo apt-get install tftpd-hpa
Next, files can be accessed from another machine on the same network by simply using the IP address of the host. Specify a folder where the files will reside on the host by replacing the folder path for TFTP_DIRECTORY with whatever folder you wish to use as your TFTP file storage location, or leave the folder as the default.
sudo gedit /etc/default/tftpd-hpa

# /etc/default/tftpd-hpa

TFTP_USERNAME="tftp"
TFTP_DIRECTORY="/var/lib/tftpboot"
TFTP_ADDRESS="0.0.0.0:69"
TFTP_OPTIONS="--secure"
If you made any changes to the settings of the TFTP server, you need to restart it for them to take effect.
sudo restart tftpd-hpa
Lastly, if you would like to grant every user on the system permission to place files in the TFTP directory, use the following command, replacing <TFTP_DIRECTORY> with your chosen location.
sudo chmod ugo+rwx <TFTP_DIRECTORY>
2.1.2 NFS
A network file-system (NFS) server gives other systems the ability to mount a file-system stored on the host and exported over the network. In embedded development, this is essential for quickly testing applications and evaluating different file-system setups.
To begin the installation process use the following command:
sudo apt-get install nfs-kernel-server
Exported filesystems are designated in the "/etc/exports" file and allow you to choose both the directory to be exported and many settings for accessing the exports. Below is an example for exporting a folder called "nfs_export-ex" located in a user's home directory.
sudo gedit /etc/exports

# /etc/exports

/home/<user>/nfs_export-ex  *(rw,sync,no_root_squash,no_subtree_check)
The options (rw, sync, no_root_squash, no_subtree_check) for this folder are essential in setting up the NFS export correctly. For more information on additional options, refer to the man page for 'exports'.
rw enables
read and write access when the directory is mounted
sync
tells the file-system to handle local access calls before remote access
no_root_squash
allows root access when mounting the file-system
no_subtree_check
reduces the number of checks the server must make to ensure that an exported sub-directory is within an exported tree and also enables access to root files in conjunction with no_root_squash
After modifying this file, in order to mount the directories as an NFS, you must force the NFS server to export all of the directories listed in "/etc/exports".
sudo /usr/sbin/exportfs -va
2.1.3 Samba
Samba servers are an excellent way to access a Linux file-system on a Windows machine via a network connection. Using a Samba server, it is quick and easy to transfer files between systems. To install a Samba server, use the following command:
sudo apt-get install samba
Before the Samba share can be mounted on another machine it's necessary to modify the configuration file to allow write access and access to home directories. Start by editing the "/etc/samba/smb.conf" file.
sudo gedit /etc/samba/smb.conf
Inside this file there are four specific things that need to be uncommented (remove the ';' at the beginning of the line) to enable the sharing of home folders and write access. Below is the section that must be modified:
#======================= Share Definitions =======================

# Un-comment the following (and tweak the other settings below to suit)
# to enable the default home directory shares. This will share each
# user's home directory as \\server\username
;[homes]
;   comment = Home Directories
;   browseable = yes

# By default, the home directories are exported read-only. Change the
# next parameter to 'no' if you want to be able to write to them.
;   read only = no
The outcomes after the changes are made follow:
#======================= Share Definitions =======================

# Un-comment the following (and tweak the other settings below to suit)
# to enable the default home directory shares. This will share each
# user's home directory as \\server\username
[homes]
   comment = Home Directories
   browseable = yes

# By default, the home directories are exported read-only. Change the
# next parameter to 'no' if you want to be able to write to them.
   read only = no
NOTE: It might also be necessary to change the "workgroup = " line to match the workgroup for your machine.
To apply the changes, the next step is to restart all Samba-related processes.
sudo restart smbd
sudo restart nmbd
Lastly, each user needs to have a password enabled to be able to use the Samba server. There are no rules for this password. The simplest method for choosing this password is to make it the same as the UNIX user's password, but it is not a requirement. After typing in the command below, you will be prompted to enter the password for the specified user.
sudo smbpasswd -a <user>
As mentioned in the configuration file, the samba share can be connected by accessing "\\<host machine ip>\\<user>" by either mounting a network share or using Windows explorer to navigate to it.
2.2 PTXdist
2.2.1 General Information
PTXdist is a set of tools created by Pengutronix to help manage all of the BSP sources, from x-loader to the filesystem and its applications. It makes it easier for a user to manage everything for specific platforms and toolchains without manually repeating relatively complex commands every time it is necessary to build a new image. It is important to note the PTXdist version because more than one may be necessary for building the toolchain and BSP.
2.2.2 Extracting Sources
Visit the phyCORE-AM335x's BSP page for information on the current versions of BSP tools.
Potentially, two versions of PTXdist will need to be downloaded:
- ptxdist-2011.11.0 for installing/constructing the cross-compile toolchain (Optional if using a pre-existing environment)
- ptxdist-2012.03.0 for building the BSP with the toolchain mentioned above.
The following instructions correspond to downloading PTXdist for building the BSP, ptxdist-2012.03.0. Therefore, to download the PTXdist software for building the toolchain, ptxdist-2011.11.0, repeat the instructions replacing 2012.03.0 with 2011.11.0. In order to be built, extract the archive containing the PTXdist software:
tar -jxvf ptxdist-2012.03.0.tar.bz2
cd ptxdist-2012.03.0
Now that the source has been extracted, the next step is to configure it for building.
2.2.3 Pre-Requisites
PTXdist checks for specific packages that must be installed before it can be successfully built. From the PTXdist source directory, ptxdist-2012.03.0, execute the command to begin a script that uses GNU autotools to help set up the environment for building the distribution.
./configure
This command automatically stops if it is missing a package and states why and what package to install to continue with the initial setup. After successfully running the configure script, build and install PTXdist.
From the PTXdist source directory, ptxdist-2012.03.0:
make
sudo make install
The install location is "/usr/local" by default, which is why the make install command must be run with root privileges. If another directory is preferred for the install, use the --prefix option when installing, but be sure to add the "bin/" directory of the installed tools in this new folder to $PATH by modifying and sourcing ~/.bashrc.
source ~/.bashrc
Now that the install is complete, the PTXdist folder can be removed, as well as the original archive.
Optional:
cd ..
rm  -rf ptxdist-2012.03.0*
2.2.4 Using PTXdist
PTXdist is a console command tool and different functions are run by extending parameters to the ptxdist base command.
ptxdist <parameter>
To generate a full list of parameters and a description of the function, use the help command:
ptxdist help
Since PTXdist versions can be installed in parallel it may be useful to view the version number corresponding to the ptxdist command:
ptxdist --version
If the output of this command does not correlate to the desired version of PTXdist, affix the ptxdist command with the version number. For example, for the phyCORE-AM335x BSP, affix all ptxdist commands with 2012.03.0 resulting in ptxdist-2012.03.0:
ptxdist-2012.03.0 <parameter>
Alternatively, to correlate the ptxdist command with a specific version create a symbolic link. For example, for ptxdist to correlate to ptxdist-2012.03.0:
sudo ln -fs /usr/local/lib/ptxdist-2012.03.0/bin/ptxdist /usr/local/bin/ptxdist
- Wrong PTXdist Version
It is important to use the correct version of PTXdist when building the Toolchain or BSP. If the incorrect version is used, the following will result:
error: The ptxconfig file version and ptxdist version do not match:configfile version: 2012.03.0ptxdist version: 2011.11.0
You can either migrate from an older ptxdist release with:'ptxdist migrate'
or, to ignore this error, add '--force'to ptxdist's parameters, e.g.:'ptxdist --force go'
The version of PTXdist used is noted as ptxdist version where the one required is specified as configfile version. Therefore, rerun the command with the correct version either appended to ptxdist or create a symbolic link. If the merge or force options were used on the Toolchain or BSP they will need to be removed and reinstalled to be built with the correct PTXdist version. Please note that the above is a generic example and may not apply directly to your BSP.
2.2.4.1 Setup
The first time PTXdist is used, there are some setup properties that have to be configured. To run PTXdist's setup, use the following command:
ptxdist setup
Once in the ptxdist setup, the only settings that should be modified are the User->Name and User->eMail. This is mainly for general logging purposes. If you wish to modify any other settings, please refer to the Getting Help section for a link to PTXdist documentation.
Since PTXdist works with sources only, it needs to grab source archives from the web using wget as it advances through its setup if they do not exist already. Therefore, an internet connection is required.
2.3 Toolchains
In order to build images or applications for an embedded device, it is necessary to have a cross toolchain that will perform the necessary operations to compile code for a specified processor and system setup.
Each toolchain will have a modified GNU Compiler Collection (gcc) designed for the desired setup. The phyCORE-AM335x PD12.1.0 uses the arm-cortexa8 toolchain which can be built from the OSELAS.Toolchain-2011.11.1 and ptxdist-2011.11.0 sources.
2.3.1 Existing Toolchains
If a working toolchain is already installed for a given architecture, it is possible to use this instead of building an OSELAS Toolchain. Do note that since external toolchains have not been tested it is possible that they may not work properly across all environments.
An extra step needs to be taken if the plan is to use an external toolchain. By default, the software package will be set to check for the vendor toolchain that it was compiled with. In order to change this, use the following command inside the root directory of the BSP:
ptxdist platformconfig
    architecture --->
        toolchain --->
            () check for specific toolchain vendor
2.3.2 Building OSELAS Toolchains
An OSELAS toolchain, managed by PTXdist, can be easily built for a target architecture.
For the phyCORE-AM335x, the arm-cortexa8 architecture based toolchain is built from OSELAS.Toolchain-2011.11.1 [Here] and PTXdist 2011.11.0 [Here]. See Section 2.2 for information regarding the installation of PTXdist sources.
tar -jxvf OSELAS.Toolchain-2011.11.1.tar.bz2
cd OSELAS.Toolchain-2011.11.1
Be sure to use the correct ptxdist version for the toolchain by affixing all ptxdist commands with 2011.11.0 resulting in ptxdist-2011.11.0 or see Section 2.2.4 for information on creating a symbolic link between ptxdist and ptxdist-2011.11.0.
ptxdist select ptxconfigs/arm-cortexa8-linux-gnueabi_gcc-4.6.2_glibc-2.14.1_binutils-2.21.1a_kernel-2.6.39-sanitized.ptxconfig
ptxdist go
The toolchain is now built and installed in /opt/OSELAS.Toolchain-2011.11.1/arm-cortexa8-linux-gnueabi and ready to be used for building the BSP.
If you wish to build applications outside of the BSP directory, add the toolchain location to your PATH. Use the following from the command line or permanently add to your PATH by including it in .bashrc:
PATH=/opt/OSELAS.Toolchain-<toolchain version>/arm-<processor>-linux-gnueabi_gcc-linaro-<version>_glibc-<version>_binutils-<version>_kernel-<version>-sanitized/bin/:$PATH
Following a successful build, the OSELAS.Toolchain-2011.11.1 folder can be removed, as well as the original archive.
Optional:
cd ..
rm  -rf OSELAS.Toolchain-2011.11.1*
2.3.2.1 Protecting Toolchains
It is recommended, although optional, to set the /opt/OSELAS.Toolchain-2011.11.1/arm-cortexa8-linux-gnueabi directory and its contents as read-only to prevent accidental modifications to the toolchain.
3 Board Setup-phyCORE-AM335x
The phyCORE-AM335x comes pre-flashed with MLO, barebox, linux kernel, and root filesystem. After the device is out of the box and setup, simply applying power will boot the pre-installed images from NAND flash.
3.1 Connections
Power and host-PC connections must be made to the target device. The hardware manual, included with the Rapid Development Kit, may be referred to for specific connection information.
3.1.1 Power
The primary input power for the phyCORE-AM335x Carrier Board comes from the wall adapter jack, X3 (+5 V). Upon application of power, LED D2 should light up (red) and initial serial data will be sent by UART0. The Carrier Board provides options for a warm reset or system power ON/OFF without the removal of the power source through push buttons S6 and S7, respectfully.
3.1.2 Serial
A serial connection is used as system communication for boot-up interaction throughout start-up and as a monitoring/debugging interface. This connection is made between the Host and UART0 on the phyCORE-AM335x.
The following provides a summary of the serial settings required to allow console access over the serial port in a communications program on the host such as Minicom:
| Setting | Value |
|---|---|
| Bits per second | 115200 bsp |
| Data bits | 8-bits |
| Stop-bit | 1 |
| Flow Control | None |
3.1.2.1 Minicom
Minicom is the recommended communications program on the host for serial communication to the device.
To install Minicom, execute the following in a terminal on the host:
/* if Minicom is not installed */
sudo apt-get install minicom
Start minicom from the terminal in the following way:
minicom -c on -s
Minicom will be executed and the main menu will be displayed in the terminal:

Navigate to "Serial port setup" in the Minicom main menu and modify line A - Serial Device : to read /dev/ttyS0 and line E - Bps/Par/Bits : to have a speed of 115200 and 8-N-1 (8N1) for the stop bits:


Note: The serial device is dependent on what COM port you are connected to on your system, so /dev/ttyS0 is merely an example.
Return to the main menu of minicom and select Save setup as dfl to make this the default setup anytime Minicom is loaded, meaning minicom -c on is all that needs to be done in the future for this machine to be able to communicate with the kit. Be sure that permissions allow writing to minirc.dflby:
sudo chmod ugo+rwx /etc/minicom
3.1.3 Ethernet
The Ethernet connection is used for flashing, downloading, and debugging images and applications. Connect the cross-over Ethernet cable to the Ethernet connector on the target, X12, and appropriate network card on the host. LED D15 (green) on the Carrier Board verifies the connection.
3.2 Image Format
The bootloader, kernel, and root filesystem specific to the phyCORE-AM335x can be provided over a wide variety of sources such as the PHYTEC FTP, preloaded to NAND Flash, SD Card, TFTP Server, or NFS Server. Refer to the Flashing Images section for information on how to flash these images.
3.2.1 PHYTEC FTP
If for any reason it is necessary to re-flash the example images, they are located on the PHYTEC America FTP [here].
Additionally, kernel and root filesystem images with WiFi enabled are available on the PHYTEC America FTP [here].
3.2.2 NAND Flash
The images on NAND Flash should be named in the following way:
| File | File Name |
|---|---|
| MLO | MLO |
| barebox | barebox.img |
| barebox environment | bareboxenv |
| Linux kernel | uImage-pcm051 |
| Root filesystem | root.ubi |
3.2.3 SPI NOR Flash
When used, SPI NOR Flash, suitable for small code footprint applications, can be used for booting. Since the MLO for SPI NOR Flash must be byte-swapped, the MLO is built under a different configuration (Section 4.2.1.1). The files on SPI NOR Flash should match the following format:
| File | File Name |
|---|---|
| MLO | MLO.spi |
| barebox | barebox.bin |
| barebox environment | bareboxenv |
| Linux kernel | uImage-pcm051 |
| Root filesystem* | root.ubi |
NOTE: Do not use the barebox.bin created with MLO.spi, it will not work properly and has a known bug.
* root.ubi in this BSP release is too large to be stored in NOR Flash
3.2.4 SD Card
Images can be placed on a SD/MMC card in the following way:
Insert SD/MMC Card on host machineConfigure SD/MMC Card with 64MB fat partition and mark as bootable [instructions here]Copy the files, in order, to the SD Card. The files copied to the SD Card depend on the intended use and are summarized by the following:
| User Intentions | File Order | File Name |
|---|---|---|
| Boot from SD Card | MLO barebox Linux kernel root filesystem | MLO barebox.img uImage-pcm051 root.tgz* |
| Flash NAND | MLO barebox Linux kernel root filesystem | MLO barebox.img uImage-pcm051 root.ubi |
| Flash SPI NOR | MLO barebox Linux kernel root filesystem | MLO.spi barebox.bin uImage-pcm051 root.ubi |
*In the case of booting Linux from the SD Card, extract the contents of root.tgz to the second partition of the SD Card in the following way:
sudo tar -zxf root.tgz -C /media/rootfs
3.2.5 TFTP Server
Images are available over the TFTP server, setup in Section 2.1.1.
The following files are present in a directory, such as <TFTP_DIRECTORY>/phyCORE-AM335x/images, on the server:
| File | File Name |
|---|---|
| MLO | MLO |
| barebox | barebox.img |
| barebox environment | barebox-default-environment |
| Linux kernel | uImage-pcm051 |
3.2.6 NFS Server
An entire root filesystem can be made accessible over the NFS Server, setup in Section 2.1.2.
To have the ability to mount the file system, root.tgz can be extracted to a NFS server directory such as /home/<user>/phyCORE-AM335x/NFS:
sudo tar -zxf root.tgz -C /home/<user>/phyCORE-AM335x/NFS/
3.3 Booting Configurations
The bootloader, one of the key software components included in the BSP, completes the required hardware initializations to download and run operating system images. The boot mode, selected from the S5 dipswitch on the Carrier Board, determines the location of the x-loader, MLO. Commonly, the Carrier Board switches will also determine the location of barebox, which is booted by MLO. The S5 switch settings for the boot modes of NAND, SPI NOR, and MMC/SD Card are shown by the following:
3.3.1 NAND
To boot from NAND, using the following switch settings:
S5-1 to S5-8 OFF

3.3.2 SPI NOR
To boot from SPI NOR, use the following switch settings:
S5-1, S5-2, S5-5, S5-6 ONS5-3, S5-4, S5-7, S5-8 OFF

3.3.3 SD Card
To boot from SD Card, use the following switch settings:
S5-1 to S5-4, S5-6 ONS5-5, S5-7, S5-8 OFF

3.4 Working with Barebox
The phyCORE-AM335x uses barebox as its bootloader, which is provided with a predefined environment setup to support the target device. After connecting the board to a terminal emulator via a serial connection, apply power to start booting the target. Approximately three seconds are allotted to hit any key which will halt autoboot and enter barebox:
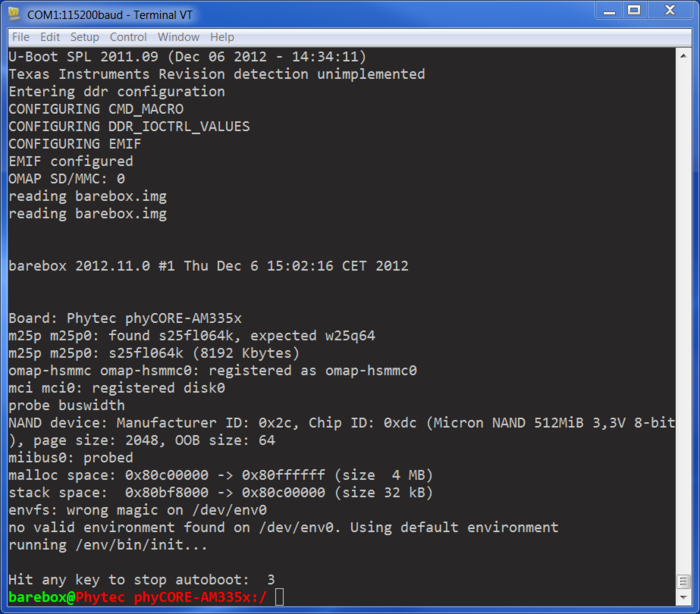
A full list of available barebox commands along with their usage is available by the help command:
help
Barebox can be customized with environment variables and scripts to support a wide variety of booting and flashing options.
3.4.1 Environment Variables
The settings most necessary for operation are environment variables in barebox. To obtain a list of current environment variables, use the printenv command:
printenv
3.4.2 Configuration File
The configuration file provided by barebox is located in /env/config, this file allows the user among many things, to modify environment variables and setup networking parameters. To open and make edits to the /env/config file, do the following in barebox:
edit /env/config
3.4.2.1 Remote Settings
A part of setting network parameters is to enter the IP address of the TFTP and NFS servers, which is likely the IP address of the host if setup in Section 2.1.2. Therefore, search for the line beginning with eth0.serverip and modify to reflect the correct IP address, 192.168.3.10 is the default:
eth0.serverip=192.168.3.10
3.4.2.2 NFS Root Directory
If intending to mount the root filesystem by NFS it is required to specify the path. The NFS root path is determined by the location of the files extracted from rootfs.tgz in Section 3.2.6, such as /home/<user>/phyCORE-AM335x/NFS/. In the configuration file, search fornfsroot=”$eth0.serverip:/path/to/root" and modify to read the proper path:
nfsroot="$eth0.serverip:/home/<user>/phyCORE-AM335x/NFS/"
3.4.2.3 Image Files
The default location of the Linux kernel and root filesystem as well as the file type can be changed in the configuration file.
Kernel Image File
The Linux kernel image file is configurable in terms of the default location to load and execute the file, search for the kernel_loc environment variable in the Barebox environment configuration file and replace with one of the supported locations:
| Supported Location | Configuration File |
|---|---|
| NAND | kernel_loc = nand |
| NOR | kernel_loc = nor |
| SD/MMC | kernel_loc = disk |
| TFTP | kernel_loc = net |
Root Filesystem Image
The root filesystem is configurable in terms of default location and the file type. The file type of the root filesystem is dependent on the location, see Section 3.2 for more information. Search for the rootfs_loc and rootfs_type environment variables in the Barebox environment configuration file and modify based on the following:
| Location | File Location | File Type |
|---|---|---|
| NAND | rootfs_loc = nand | rootfs_type = ubifs |
| NOR* | rootfs_loc = nor | rootfs_type = ubifs |
| SD/MMC | rootfs_loc = disk | rootfs_type = ext3 |
| NFS | rootfs_loc = net | rootfs_type = ext3 |
* NOR only supports a minimal filesystem.
After making any changes, quit the program and return to the barebox prompt by pressing CTL+D, type saveenv to save changes:
saveenv
3.4.3 Restore to Default
If the barebox environment variables need to be restored for any reason, simply delete the parameter save location in NAND, and the defaults will be restored with the next boot.
erase /dev/nand0.bareboxenv
3.4.4 Booting Options
From barebox, the boot process continues by loading the kernel which then mounts the root filesystem. Both the kernel and root filesystem locations are determined from the barebox environment. The locations classify booting Linux stand-alone or remote, where the components required are provided in the onboard media (NAND, SPI NOR, SD/MMC Card) or via a network (TFTP or NFS).
3.4.4.1 Boot Command
Selection of the location to continue booting is provided as a boot command in the current barebox environment. This command allows the user to specify the mode over which it will boot with respect to the kernel, root filesystem, ip, and oftree options. The generic usage of this command is described by the following:
boot [-m <mode>] [-k <kernel_option>] [-r <rootfs_option>] [-i <ip_mode>] [-o <oftree_option>]
By typing _boot_help in the barebox prompt, a summary of the syntax, options, and parameters are provided.
3.4.4.2 Stand-Alone NAND Booting
By default, the kit comes setup for a standalone boot from NAND Flash. Therefore, without modification to environment variables and the correct NAND boot switch settings described in Section 3.3.1, barebox will boot the preloaded Linux kernel from NAND.
Alternatively, executing commands given by the following, tells the system to boot using the Linux kernel and/or filesystem located in NAND, which is useful in the case where the boot mode on the Carrier Board is set in a configuration other than NAND boot:
| Description | Barebox |
|---|---|
| Boot kernel from NAND Flash and mount rootfs from default | boot –k nand |
| Boot kernel from default and mount rootfs from NAND Flash | boot -r nand |
| Boot kernel and mount rootfs from NAND Flash | boot -k nand -r nand boot -m nand |
3.4.4.3 Stand-Alone SPI NOR Booting
The Linux kernel can be stored on SPI NOR Flash, however there are size restrictions for the root filesystem. A minimal filesystem could be stored on the SPI NOR Flash but root.ubi image created from this BSP cannot. The use of the boot command can be used to load and execute the Linux kernel and a minimal root filesystem in the following way:
| Description | Barebox |
|---|---|
| Boot kernel from SPI NOR Flash and mount rootfs from default | boot –k nor |
| Boot kernel from default and mount rootfs from SPI NOR Flash | boot -r nor |
| Boot kernel and mount rootfs from SPI NOR Flash | boot -k nor -r nor boot -m nor |
3.4.4.4 Stand-Alone SD/MMC Card Booting
The boot command can be used to load and execute the Linux kernel from SD/MMC.
For the additional option to mount the root filesystem from SD/MMC be sure to modify rootfs_type in the Configuration File to reflect ext3 as described in Section 3.4.2.3 under Root Filesystem Image.
| Description | Barebox |
|---|---|
| Boot kernel from SD/MMC and mount rootfs from default | boot –k disk |
| Boot kernel from default and mount rootfs from SD/MMC | boot -r disk |
| Boot kernel and mount rootfs from SD/MMC | boot -k disk -r disk boot -m disk |
3.4.4.5 Remote Booting
For development it may be beneficial to modify the boot settings to allow the kernel to be loaded from TFTP, and/or mount a network filesystem hosted on the NFS, as specified in Sections 3.2.5 and 3.2.6, respectfully. Refer to Sections 3.4.2.1 and 3.4.2.2 for information on Configuration File settings as a part of setup for these options.
Examples of the wide variety of remote booting options the barebox boot command supports is given by the following:
| Description | Barebox |
|---|---|
| Boot kernel from TFTP and mount rootfs from default | boot –k tftp |
| Boot kernel from default and mount rootfs from NFS | boot -r net |
| Boot kernel from TFTP and mount rootfs from NFS | boot -k tftp -r net boot -m tftp |
3.5 Booting the Target
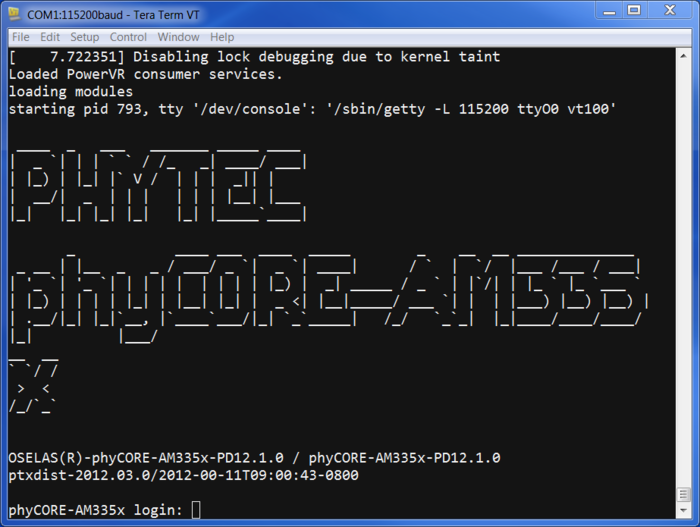
After selecting the boot source, the target starts booting. When prompted, after the target has finished loading the system, the default login of root can be used:
3.5.1 Powering off the Target
Before removing power, it is recommended to execute the poweroff command to close out the filesystem, shut down the system, and power off. This is recommended to maintain system integrity by preserving bad blocks:
poweroff
The system can also be restarted:
reboot
3.5.2 Using WiFi
The Linux kernel and root filesystem images must be built with WiFi enabled to use WiFi on the as described in Section 3.7.4. Alternatively, the pre-built WiFi enabled images, available on the PHYTEC America FTP here, can be used.
The appropriate configuration for the network can be setup by editing the file /etc/wpa_supplicant.conf on the target:
vim /etc/wpa_supplicant.conf
Replace my_network_ssid and my_network_password with the networks SSID and password. Depending on the network, proto may also need to be changed to WPA2:
ctrl_interface=/var/run/wpa_supplicant
eapol_version=2
network={
  ssid="my_network_ssid"
  proto=WPA
  key_mgmt=WPA-PSK
  pairwise=CCMP TKIP
  group=CCMP TKIP
  psk="my_network_password"
}
Save the changes (: wq if using vim) and restart the system.
When the target has booted, WiFi can be setup as a network interface that takes precedence over eth0 or eth1 when using network commands:
# if eth0 is configured
ifconfig eth0 down

# if eth1 is configured
ifconfig eth1 down


# Replace ###.###.###.### with IP address of the target device
ifconfig wlan0 ###.###.###.###

# Replace ###.###.###.### with IP address of the gateway, for routing to external network
route add default gw ###.###.###.###
4 Modifying the BSP
The BSP provided can be modified through the source code in the board files or through configuration management.
4.1 Board Files
All source code is located in the phyCORE-AM335x-PD12.1.0/platform-phyCORE-AM335x/build-target directory. To help integrate and modify features on the system for both driver development and general settings or Carrier Board design, it is necessary to know about the board files summarized by the following:
| Board File | Location | Board Config File |
|---|---|---|
| Linux kernel | linux3.2 | /arch/arm/mach-omap2/board-pcm051.c |
| Barebox | barebox-2012.11.0 | /arch/arm/boards/pcm051/env/* |
4.2 Managing Configurations
PTXdist uses the kernel configuration, KConfig, files present throughout the BSP for straightforward user configuration of individual settings and drivers. The platform, kernel, and project’s root filesystem configuration menus will be the most beneficial.
The phyCORE-AM335x PD12.1.0 BSP uses PTXdist version 2012.03.0, see Section 2.2 for additional information on using PTXdist. If a symbolic link was not created between ptxdist and ptxdist-2012.03.0 as described in Section 2.2.4, affix all ptxdist commands with 2012.03.0 resulting inptxdist-2012.03.0.
4.2.1 Platform
The platform configuration menu contains the default settings for each platform including what bootloaders, kernel, and filesystem images are to be built and located. The settings for the platform are modified using the following command:
ptxdist platformconfig
This menu can be used to select the build configurations specific to the SPI NOR bootloader. Otherwise, as a user, it is very rare to modify these settings, but it may be useful to view them:

4.2.1.1 Creating MLO.spi
Since the MLO used for SPI NOR Flash has to be byte-swapped, the u-boot target configuration settings must modified and the boot images will need to be rebuilt. In ptxdist platformconfig select bootloaders and then U-boot, by changing (pcm051) U-Boot config target to (pcm051_spiboot) U-Boot config target the required modifications are made. Save and exit platform config and rebuild the bootloader images:
ptxdist clean u-boot
ptxdist targetinstall u-boot
This will create the SPI NOR Flash specific MLO.spi file. Also, it will create u-boot.bin, however, this file has a known bug and does not work properly, therefore use of it is not recommended.
4.2.2 Kernel
The kernel configuration menu allows the user to adjust the drivers and support included in a Linux kernel build. The settings are available by using the following command:
ptxdist kernelconfig

See Section 3.7.4 for information on configuring the Linux kernel to enable WiFi.
4.2.3 Root Filesystem
Configuration of the project’s filesystem can be done in the overall menuconfig. By toggling the options in the base configuration, the applications and content built into the filesystem can be modified directly. This allows both minimal and more complete filesystem builds to be created easily. The following command will open the configuration menu:
ptxdist menuconfig

See Section 3.7.4 for information on configuring the root filesystem to support WiFi.
4.2.4 Enabling WiFi
To BSP can be built to enable WiFi by modifying the Linux kernel file and ptxdist configuration:
Edit the Linux kernel file
Open linux-am335x/arch/arm/mach-omap2/board-pcm051.c and change "#define CBMUX_VAL 2" to "#define CBMUX_VAL 1"
#define CBMUX_VAL 1
Enable WiFi in the kernel
In kernel configuration enable the following:
ptxdist kernelconfig
    Networking Support --->
       Wireless --->
            <*> cfg80211 -wireless configuration API
               [*] cfg80211 wireless extensions compatibility
            <*> Generic IEEE 802.11 Networking Stack (mac80211)
    Device Drivers --->
       Network device support --->
            [*] Wireless LAN --->
               <*> TI wl12xx driver support --->
                   <M> TI wl12xx support
                   <M> TI wl12xx SDIO support
Support WiFi in the root filesystem
In the menu configuration enable the following:
ptxdist menuconfig
    [*] Wifi module support
The file /etc/wpa_supplicant.conf on the target will need to have the appropriate configuration for the network, described in Section 3.5.2.
4.3 Building Images with PTXdist
Building and creating images with PTXdist is very simple, the phyCORE-AM335x PD12.1.0 BSP uses PTXdist version 2012.03.0 therefore affix all ptxdist commands with 2012.03.0 resulting in ptxdist-2012.03.0 or see Section 2.2.4 for information on creating a symbolic link between ptxdist andptxdist-2012.03.0.
All the required steps to compile sources and build packages in the correct order are done using the ptxdist go command. Following a successful build, the command, ptxdist images, will create images to deploy on the target.
Before starting a build, the userland and platform configuration must be specified:
ptxdist select configs/ptxconfig
ptxdist platform configs/phyCORE-AM335x/platformconfig
The toolchain should be automatically detected and read:
found and using toolchain:
'/opt/OSELAS.Toolchain-2011.11.1/arm-cortexa8-linux-gnueabi/gcc-4.6.2-glibc-2.14.1-binutils-2.21.1a-kernel-2.6.39-sanitized/bin'
To compile and build the BSP, execute the go command from the BSP project directory:
ptxdist go
The build process relies on obtaining source information from the web, therefore in some cases the content to be downloaded may no longer exist or the path may have changed resulting in ptxdist go failures. Generally, if this occurs, the issue can be resolved by searching the filename as it appears in the build output, downloading the file and placing it in phyCORE-AM335x-PD12.1.0/src directory in its compressed form.
- iproute2-2.6.39.tar.gz
Wrong md5sum for 'iproute2' due to "301 Moved Permanently" or a change of path for the fileSolution - Download iproute2-2.6.39.tar.gz from an alternate source : http://pkgs.fedoraproject.org/repo/pkgs/iproute/iproute2-2.6.39.tar.gz/8a3b6bc77c2ecf752284aa4a6fc630a6/iproute2-2.6.39.tar.gz and place it in the phyCORE-AM335x-PD12.1.0/src directory.
A root filesystem image can be created from the built content, by executing the images command in the BSP project directory:
ptxdist images
All images are stored in phyCORE-AM335x-PD12.1.0/platform-phyCORE-AM335x/images, the following can be expected:
barebox-default-environmentbarebox.binbarebox.imglinuximageMLOroot.tgzroot.ubifsroot.ubi
5 Flashing Images
Flashing images can be relatively complex and there are two main ways to accomplish this in barebox, the update command and SD/MMC Card.
5.1 Update Command (Remote Flashing)
To update the bootloader, kernel, or filesystem in flash, the current barebox environment provides the update command. This command allows the user to specify the file to be flashed, the mode over which it will be flashed, and the path to the image. The generic usage of this command is described by the following:
update -t <kernel|rootfs|barebox|bareboxenv|xload|oftree> -d <nor|nand> [-m tftp|xmodem] [-f imagename] –c
By typing _update_help or update in the barebox prompt, a summary of the syntax, options, and parameters are provided.
5.1.1 TFTP
TFTP is one of the simplest ways to apply modifications during development; it is commonly used for single file updates such as the bootloader, kernel, and files from the root filesystem.
The update command in barebox can be used to flash images to NAND or NOR flash from the TFTP Server in the correct format and located, for example, at <TFTP_DIRECTORY>/phyCORE-AM335x/images as specified in Section 3.2.5:
NAND Flash
| Update file | NAND |
|---|---|
| MLO | update -t xload -d nand –m tftp -f phyCORE-AM335x/images/MLO |
| barebox | update -t barebox -d nand –m tftp -f phyCORE-AM335x/images/barebox.img |
| bareboxenv | update -t bareboxenv -d nand –m tftp -f phyCORE-AM335x/images/bareboxenv |
| kernel | update -t kernel -d nand –m tftp -f phyCORE-AM335x/images/uImage-pcm051 |
| rootfs | update -t rootfs -d nand –m tftp -f phyCORE-AM335x/images/rootfs.ubi |
NOR Flash
| Update file | NOR |
|---|---|
| MLO | update -t xload -d nor –m tftp -f phyCORE-AM335x/images/MLO |
| barebox | update -t barebox -d nor –m tftp -f phyCORE-AM335x/images/barebox.bin |
| bareboxenv | update -t bareboxenv -d nor –m tftp -f phyCORE-AM335x/images/bareboxenv |
| kernel | update -t kernel -d nor –m tftp -f phyCORE-AM335x/images/uImage-pcm051 |
| rootfs | update -t rootfs -d nor –m tftp -f phyCORE-AM335x/images/rootfs.ubi |
NOTE : TFTP is the default mode, as set in /env/config in barebox, therefore, “-m tftp” can be omitted from update commands.
5.2 SD/MMC Flashing
The storage device, SD/MMC, of the target provides a method for flashing the bootloader, kernel, and root filesystem to NAND. After booting from the SD/MMC Card, commands in barebox can be used to complete flashing. The general procedure is described by the following:
Set eccmode (error-correction-code mode)Erase the NAND or NOR Flash at the target locationCopy file from SD/MMC Card to flash at the target location
Prior to flashing from SD/MMC to NAND or NOR Flash, the SD/MMC Card must be successfully mounted. Mounting of the SD/MMC Card can be done in barebox by the following:
mkdir mnt
mount /dev/disk0.0 fat /mnt
An update of barebox may be required in the case of modifications to the bootloader or kernel. Before barebox can be flashed to NAND or NOR Flash by the SD/MMC Card, bareboxenv must be erased. If edits to the /env/config file have been made, it is recommended that before erasing bareboxenv, the contents be copied for external reference.
NAND
erase /dev/nand0.bareboxenv.bb
saveenv
NOR
erase /dev/nor0.bareboxenv
saveenv
The following provides examples of individual files flashed to NAND and NOR Flash from SD/MMC in barebox:
NAND
| Description | Barebox |
|---|---|
| Update MLO into NAND via SD/MMC | gpmc_nand0.eccmode=${xload_eccmode}
erase /dev/nand0.xload.bb
cp /mnt/MLO /dev/nand0.xload.bb
|
| Update barebox into NAND via SD/MMC | gpmc_nand0.eccmode=${barebox_eccmode}
erase /dev/nand0.barebox.bb
cp /mnt/barebox.img /dev/nand0.barebox.bb
|
| Update kernel into NAND via SD/MMC | gpmc_nand0.eccmode=${kernel_eccmode}
erase /dev/nand0.kernel.bb
cp /mnt/uImage-pcm051 /dev/nand0.kernel.bb
|
| Update rootfs into NAND via SD/MMC | gpmc_nand0.eccmode=${root_eccmode}
erase /dev/nand0.root.bb
cp /mnt/root.ubi /dev/nand0.root.bb
|
NOR
| Description | Barebox |
|---|---|
| Update MLO into NOR via SD/MMC | gpmc_nor0.eccmode=${xload_eccmode}
erase /dev/nor0.xload
cp /mnt/MLO.spi /dev/nor0.xload
|
| Update barebox into NOR via SD/MMC | gpmc_nor0.eccmode=${barebox_eccmode}
erase /dev/nor0.barebox
cp /mnt/barebox.bin /dev/nor0.barebox
|
| Update kernel into NOR via SD/MMC | gpmc_nor0.eccmode=${kernel_eccmode}
erase /dev/nor0.kernel
cp /mnt/uImage-pcm051 /dev/nor0.kernel
|
| Update rootfs into NOR via SD/MMC | gpmc_nor0.eccmode=${root_eccmode}
erase /dev/nor0.root
cp /mnt/root.ubi /dev/nor0.root
|