1 About this Quickstart
This document describes how to install and work with the Linux Board Support Package (BSP) for the phyCORE-Vybrid platform. This BSP provides a fundamental software platform for development, deployment and execution on the phyCORE-Vybrid.
The Quickstart contains instructions for:
- Getting Started
- Host Setup
- Building a BSP
- Booting Configurations
2 System Requirements
2.1 Hardware
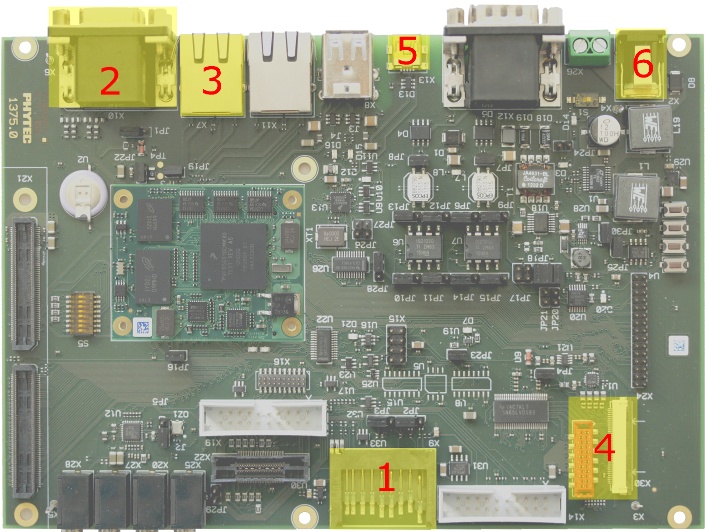
- phyCORE-Vybrid System on Module (PCM-052)
- phyCORE-Vybrid Carrier Board (PCM-952)
- SD Card with Linux software demo
- AC adapter supplying 5 VDC / 3.2 A, center positive
- Straight Ethernet cable
- Serial cable (RS-232)
- 7" VGA LVDS (optional)
2.2 Software
- To successfully build a customized Linux distribution using the Timesys Desktop Factory, your host machine must be running a modern GNU/Linux Operating System either natively via virtual machine. One of the following distributions are recommended:
- Ubuntu: Most recent release or LTS (currently 12.04 32 or 64 bit)- Fedora: Most recent release
- This Quickstart was authored and tested with Ubuntu 10.04 LTS Virtual Machine on a Windows 7 Host PC. Alternative host options are described here: https://linuxlink.timesys.com/docs/wiki/factory/FactoryHostRequirements. Access to this link requires a LinuxLink registration, see section 4.2.1.
3 Getting Started
This section is designed to get the board up-and-running with the demo images included in the kit.
The SDHC card included with the kit is pre-loaded with kit demo images. These images are available from the PHYTEC FTP [Here] and include:
| File | Location |
|---|---|
| Bootloader | bootloader/u-boot.imx |
| Linux kernel | uImage-30.-ts-armv7l |
| Root Filesystem | rootfs.tar.gz |
3.1 Making Connections
Make all required connections and then apply power to begin booting the device.
1. Insert the supplied SDHC card in the SD card slot (X9)
2. (optional) Connect the Ethernet cable to the RJ-45 connector (X7) and appropriate network card on the host
3. (optional) Connect the serial cable between RS232 DB9 (X10 top connector) and host - 1115200 baud, 1 start bit, 8 data bits, 1 stop bit, no parity, no flow control
4. (optional) Connect the LCD power and data connectors to X30B and X30A, respectfully
5. Connect the provided 5 VDC suppy to the 5V-IN jack (X2)
3.2 Kit Demos
After the target boots, a Serial Communication or Vybrid Theatre demo will be started. Both demos will require a serial connection to interact with the kit and, at the very least, ensure proper shutdown. The Vybrid Theatre demo is a Qt application and can only be used when the LCD is connected to the kit.
Serial Communication
- Requires a connected serial cable -- see Step 3
Follow the instructions below to enable Minicom on your host:
1. Install Minicom via a terminal
/* if Minicom is not installed */
sudo apt-get install minicom
2. Start Minicom from the terminal:
minicom -c on -s
3. From the Minicom main menu, navigate to "Serial port setup" in the Minicom. Press Enter.4. Verify the line A - Serial Device : reads the proper serial port, ex. /dev/ttyS05. Modify the line E - Bps/Par/Bits : to have a speed of 115200 and 8-N-1 (8N1) for the stop bits.6. Press Enter to return to the main menu7. Press Esc to exit this menu
After providing power with Step 5, the system will boot into Linux. Hit enter to begin using the command prompt.
When finished with the kit demo, use the reboot command to restart, or the poweroff command to shutdown, the system. Please note that failure to use these commands to end a session could result in a corrupted file system.
Vybrid Theatre Demo
- Requires a connected LCD -- see Step 4
- Highly recommended serial connection -- see Step 3 and serial communication above
After providing power with Step 5, the system will boot into the Vybrid Theatre Demo.
Interact with the Qt application demo on the display through three buttons and drop down menu. The buttons are "Video", "Camera", and "Exit". The drop down menu selects between "Big Buck Bunny - mpeg 4" and "Big Buck Bunny - theora"*.
Note: The demo SD card boots directly into the Vybrid Theatre Demo. If the filesystem has been modified/rewritten, the system will run ts_calibrate before loading the Vybrid Theatre. Press the boxes on the screen as they appear to calibrate the touchscreen controller.
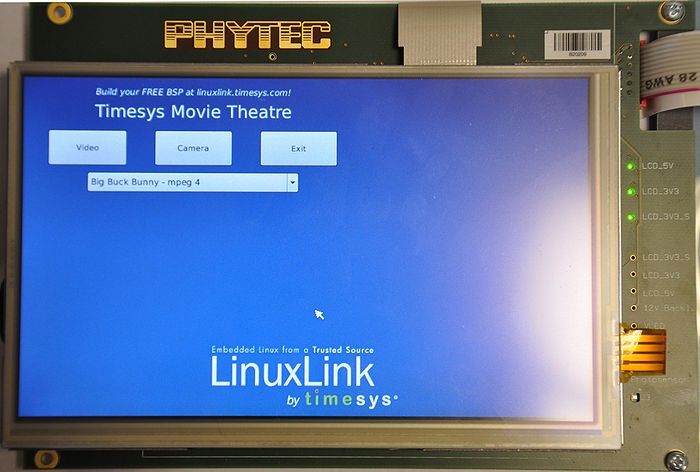
Touch the screen to select "Video" to begin playing the mpeg 4 or theora selection.
While the video is playing, touch the screen again to bring up additional information and options to control the behavior of the demo.
Displayed Information:Threads: 0-149 -- the number of threads added to increase the load of the CPU. This value can be manipulated using the + and - buttons on the left side of the screen.CPU 0: 0-100% [On] -- a total percentage of CPU usage. This value will change based on the number of threads, video progress, and system programs running parallel to the demo.FPS: ##.# -- the frames per second for the video. This value will change based on video progress, and potentially, the CPU usage.
Interactive Buttons:Select Core: 0 (dropdown) -- allows a user to select what cores are affected by the thread control and general playback. 0 is the only core supported.Disable Core -- allows a user to disable the core. This is an unsupported feature since disabling the active core will cause a system crash.Add 50 threads: (+) -- allows a user to increase the CPU load by 50 threads at a time, up to a maximum of 149 threads. This is used to help measure performance of the video based on CPU usage.Remove CPU load: (-) -- allows a user to remove the CPU load, setting the threads to zero. This is used to help measure performance of the video based on CPU usage.Play/Pause -- pause/resume the video. Resuming the video with this button will remove the overlay, but not modify the actual settings.Stop -- exit the video and return to the main menu of the demo.
In the main menu of the demo, the "Camera" button is unsupported. The application will crash if this is pressed.
The "Exit" button will gracefully close the application.
If the "Exit" button is hit, the demo can be relaunched from the Linux command line:
/etc/init.d/S98-timesys-theatre start &
To re-calibrate the touchscreen, from the Linux command line:
ts_calibrate
Press the boxes on the screen as they appear to calibrate the touchscreen controller.
When finished with the kit demo, use the reboot command to restart, or the poweroff command to shutdown, the system. Please note that failure to use these commands to end a session could result in a corrupted file system.
4 Host Setup
The phyCORE-Vybrid (PCM-052) has been developed and tested with Ubuntu 10.04 LTS Lucid Lynx [Installation Guide]. Although it is possible to use a different OS, some setup information will contain OS-specific commands and paths for settings.
Update repositories and upgrade installed packages:
sudo apt-get update
sudo apt-get upgrade
4.1 Server Setup
Support for installing and setting up TFTP, NFS, and Samba server settings to enable communication between multiple systems and the target.
4.1.1 TFTP
TFTP allows files to be downloaded from one machine to another. With most embedded Linux devices, TFTP is an efficient way to boot the kernel during development so that the user does not have to flash a new kernel every time it is modified. It is also helpful when updating images in flash from U-Boot.
First, start by installing the TFTP server.
sudo apt-get install tftpd-hpa
Next, files can be accessed from another machine on the same network by simply using the IP address of the host. Specify a folder where the files will reside on the host by replacing the folder path for TFTP_DIRECTORY with whatever folder you wish to use as your TFTP file storage location, or leave the folder as the default.
sudo gedit /etc/default/tftpd-hpa

# /etc/default/tftpd-hpa

TFTP_USERNAME="tftp"
TFTP_DIRECTORY="/var/lib/tftpboot"
TFTP_ADDRESS="0.0.0.0:69"
TFTP_OPTIONS="--secure"
If you made any changes to the settings of the TFTP server, you need to restart it for them to take effect.
sudo restart tftpd-hpa
Lastly, if you would like to grant every user on the system permission to place files in the TFTP directory, use the following command, replacing <TFTP_DIRECTORY> with your chosen location.
sudo chmod ugo+rwx <TFTP_DIRECTORY>
4.1.2 NFS
A network file-system (NFS) server gives other systems the ability to mount a file-system stored on the host and exported over the network. In embedded development, this is essential for quickly testing applications and evaluating different file-system setups.
To begin the installation process use the following command:
sudo apt-get install nfs-kernel-server
Exported filesystems are designated in the "/etc/exports" file and allow you to choose both the directory to be exported and many settings for accessing the exports. Below is an example for exporting a folder called "nfs_export-ex" located in a user's home directory.
sudo gedit /etc/exports

# /etc/exports

/home/<user>/nfs_export-ex  *(rw,sync,no_root_squash,no_subtree_check)
The options (rw, sync, no_root_squash, no_subtree_check) for this folder are essential in setting up the NFS export correctly. For more information on additional options, refer to the man page for 'exports'.
rw enables
read and write access when the directory is mounted
sync
tells the file-system to handle local access calls before remote access
no_root_squash
allows root access when mounting the file-system
no_subtree_check
reduces the number of checks the server must make to ensure that an exported sub-directory is within an exported tree and also enables access to root files in conjunction with no_root_squash
After modifying this file, in order to mount the directories as an NFS, you must force the NFS server to export all of the directories listed in "/etc/exports".
sudo /usr/sbin/exportfs -va
4.1.3 Samba
Samba servers are an excellent way to access a Linux file-system on a Windows machine via a network connection. Using a Samba server, it is quick and easy to transfer files between systems. To install a Samba server, use the following command:
sudo apt-get install samba
Before the Samba share can be mounted on another machine it's necessary to modify the configuration file to allow write access and access to home directories. Start by editing the "/etc/samba/smb.conf" file.
sudo gedit /etc/samba/smb.conf
Inside this file there are four specific things that need to be uncommented (remove the ';' at the beginning of the line) to enable the sharing of home folders and write access. Below is the section that must be modified:
#======================= Share Definitions =======================

# Un-comment the following (and tweak the other settings below to suit)
# to enable the default home directory shares. This will share each
# user's home directory as \\server\username
;[homes]
;   comment = Home Directories
;   browseable = yes

# By default, the home directories are exported read-only. Change the
# next parameter to 'no' if you want to be able to write to them.
;   read only = no
The outcomes after the changes are made follow:
#======================= Share Definitions =======================

# Un-comment the following (and tweak the other settings below to suit)
# to enable the default home directory shares. This will share each
# user's home directory as \\server\username
[homes]
   comment = Home Directories
   browseable = yes

# By default, the home directories are exported read-only. Change the
# next parameter to 'no' if you want to be able to write to them.
   read only = no
NOTE: It might also be necessary to change the "workgroup = " line to match the workgroup for your machine.
To apply the changes, the next step is to restart all Samba-related processes.
sudo restart smbd
sudo restart nmbd
Lastly, each user needs to have a password enabled to be able to use the Samba server. There are no rules for this password. The simplest method for choosing this password is to make it the same as the UNIX user's password, but it is not a requirement. After typing in the command below, you will be prompted to enter the password for the specified user.
sudo smbpasswd -a <user>
As mentioned in the configuration file, the samba share can be connected by accessing "\\<host machine ip>\\<user>" by either mounting a network share or using Windows explorer to navigate to it.
4.2 LinuxLink Tools Setup
LinuxLink, created by Timesys, provides web and desktop factory tools for embedded Linux development to manage toolchains, build environments, and software sources. After registering your kit, access to the BSP as well as to additional resources for Vybrid development will be provided.
4.2.1 LinuxLink Registration
Create a Timesys LinuxLink account for the PHYTEC Vybrid processor:
- Go to https://linuxlink.timesys.com/register/phytec/
- Complete all required sections on the registration form
- Enter the serial number on the SOM for the Vybrid Board MAC ID
The serial number will be a 12 digit MAC ID printed on a sticker on the SOM. Enter the 12 hexadecimal digits separating each byte by a ":" or "-"Example: MAC ID = 01:23:45:67:89:AB, Enter 01:23:45:67:89:AB or 01-23-45-67-89-AB
- Click the Get Access Now! button to submit the registration form
Once the registration form is submitted, expect a welcome email containing login information including user name and password as well as helpful links to get started.
After logging into LinuxLink [Here], the custom personal dashboard will be brought up which acts as a hub of information for embedded Linux development including relevant software, tools, educational documentation, and links to custom builds.
4.2.2 Desktop Factory Build System
The Timesys Factory Build System allows full access to the target preconfigured build system for customization and development on a host Desktop. For application development, installation of the Factory Build System is not required. If you plan to modify the phyCORE-Vybrid Linux kernel, use the following instructions to download and install the Desktop Factory Build System.
LinuxLink pre-built starting points for the PHYTEC phyCORE-Vybrid include a download for a preconfigured Desktop Factory. Download the installer from the Build Output page under Build the SDK on your host -> Download the Desktop Factory Installer -> pcm052-factory-installer.sh.
Note: See the Linux BSP release notes page for a link to the most recent pre-built Build Output page or view all in LinuxLink from the Download BSP/SDK tab under Pre Built Starting Points -> PHYTEC phyCORE Vybrid Development Kit.
chmod +x pcm052-factory-installer.sh
./pcm052-factory-installer.sh
After successfully installing the Desktop Factory, the tools will be available from the /timesys/pcm052/Factory-<version> directory.
Note: Throughout the Quickstart any reference to <factory_install_dir> refers to /timesys/pcm052/Factory-<version>.
Alternatively, a manual install of the Factory Build Engine can be performed. In the case of an upgrade, it is recommended to back up the existing factory directory and then extract the new release, which allows preservation of the unchanged platform definition. Download and extract factory.tar.gzfrom View All Files on the Build Output page.
tar –zxf factory.tar.gz
cd factory
The Factory Build system requires distribution specific packages on the host that should match the specifications summarized by Timesys [Here].
If using Ubuntu, complete the following:
sudo  apt-get install build-essential libc6-dev libtool sharutils libncurses5-dev libgmp3-dev libmpfr-dev gawk gettext bison flex gperf indent texinfo libgtk2.0-dev libgtk2.0-bin libsdl1.2-dev swig python-dev texlive-latex3 texlive-extra-utils binutils-dev automake guile-1.8 icon-naming-utils libdbus-glib-1-dev wget gtk-doc-tools libxml-parser-perl zip unzip ecj fastjar x11-xkb-utils libglade2-dev libperl-dev python-libxml2 libexpat1-dev gconf2 groff libc6-dev-amd64

sudo dpkg-reconfigure dash
# Respond “No” to the prompt asking “Install dash as /bin/sh?”

# For 64-bit host machines only
sudo apt-get install ia32-libs
sudo apt-get install libc6-dev-i386
To check that the host system has all required software run a checksystem within the factory directory, and follow the instructions for resolving missing requirements if applicable:
make checksystem
5 Building a BSP
5.1 Web Factory Wizard
The LinuxLink cloud-based development environment provides access to current build tools, configuration data, and platform prototypes providing elimination of delays attributed with installing, configuring, and maintaining a local build environment.
A workorder is required to use the LinuxLink Web Factory services for the assembly of a customized board support package. As part of the target hardware project, a workorder can be customized in terms of platform configuration options and submitted to be built on the Timesys servers.
To get started with the LinuxLink Web Factory Wizard create a phyCORE-Vybrid Board based project, it will be used to develop web based workorders built for the PHYTEC phyCORE-Vybrid platform:
Create a Project
- Go to Build BSP/SDK in LinuxLink
- Click Create a Project
- Enter a Name and Description
- Select PHYTEC phyCORE-Vybrid Development Kit for a Board
- Select an Application (optional)
- Click Create Project
Create a New Workorder
Create a new workorder to describe a specific BSP:
- Open the phyCORE-Vybrid project
- Click Create a Workorder
- Enter a Workorder Name and Description
- Optionally, click Next to be guided through custom options for building a BSP/SDK
- Click Save
Copy an Existing Workorder
Copy an existing workorder to take advantage of pre-configured platform specifications. For example, copy the PHYTEC phyCORE-Vybrid PD13.0.2 workorder to inherit the kernel, toolchain, and a default set of packages selected along with optimized build configurations for a great starting point to add target specific customizations:
- Click the copy icon
- Enter new workorder Name and Description
- Click Save
Modify an Existing Workorder
An existing workorder can be edited:
- Click on the name/link of the workorder
- For a component, click on the Edit button
5.1.1 Managing Workorders
A workorder process can be customized in terms of the Linux components including the kernel, toolchain, and package versions along with the licensing information, root filesystem optimizations, and build output options. The PHYTEC pre-built starting point BUILD-OUTPUT.txt file Here, acts as a reference for a default configuration including a minimal set of packages to be run on the target application.
The Web Factory Wizard user interface provides simple navigation through sub categories available in the top menu for configuring the BSP/SDK.
Kernel ConfigurationKernel Configuration allows selection of a Linux kernel from the Timesys provided options. By clicking on the kernel version link more information will be displayed about the kernel including the version, revision, estimated build time, license, and device drivers enabled. Additionally, the kernel .config file is available for download for inspection of the options as configured in the Linux kernel.
Toolchain ConfigurationThe Toolchain Configuration menu provides options for toolchain selection. It is recommended to select glibc Recommended because it provides a complete set of toolchain components and versioning. If a different version of toolchain components such as glic, gcc, binutils, and gdb is preferred, the custom toolchain option can be selected. More information including the version, revision, license, and an estimated build time for a toolchain component is available by clicking the component link.
Packages ConfigurationA table format that details the package names, version, license, and size information is available in the Packages Configuration menu. Browse through the Demo, Desktop, Development, Graphics, Multimedia, Networking, Runtimes, System, and Utilities categories or use the Smart Searchfeature to choose packages required for the target application. By clicking on the package, details including version, estimated build time, and license are provided. Additionally, some packages have modifiable build options which are accessed by liking the associated icon in the package listing. Checking the box next to the package name will select the package and automatically any package dependencies. Similarly, unchecking the box next to a package name will deselect the package and automatically any package dependencies. View the left panel for a summary of the both all the packages selected and dependencies as well as the total packages size.
Build Output OptionsThe Build Output Options menu allows the user to tailor the application and root filesystem output by providing options to select the specific file formats. Additionally, optimizations for along with the choice to include the native toolchain and kernel in the root filesystem are provided.
AdviceThe Advice menu or Timesys Recommendations can be used to detect any build and run or logic dependencies based on Timesys Recommendations. A user can Accept which will apply the recommendations or continue with the selections made with risk to having conflicts, incompatibilities, and deficiencies.
SummaryUse the Summary menu to review the workorder. Additionally, and use the Edit buttons as quick links to modify configurations.Based on the custom workorder, an estimated build time is generated and can be viewed at the bottom of the summary. It is important to note that this estimate does not take into account the number of builds currently being processed on the Timesys servers, therefore, a build will generally take longer than the estimated time.
After completing modifications to the workorder, click on the Save button at the bottom of the page to apply changes.
5.1.2 Building Images
A build is initiated on the Summary page of a workorder. To open the Summary from LinuxLink click Build BSP/SDK, select the project and click on the name of the workorder that is to be built. Alternatively, from an open workorder click Summary in the top menu. This menu provides a review of the workorder configuration and an estimated build time. Click the Build button to start the build.
The workorder will be queued for a short amount of time before being built on the Timesys servers. The status of the build can be viewed on the personal LinuxLink dashboard or the Download BSP/SDK page. Additionally, when the build is complete, these pages will display if the build was successful and provide a link to the download. Similarly, a user will receive notification via email when a build is complete with a link to the download.
5.1.3 Downloading Images
After notification of a successful build, links to the download for the BSP are provided via the Build Download Page or the Build Output Page.
Download Page
The BSP Download page can be opened after a successful build via the link provided by email notification or in LinuxLink from the personal dashboard or Download BSP/SDK page. It highlights relevant files from the Build output along with instructions to support different user intentions including setting up application development on the host, building the SDK on the host, and booting the board.
Click the View All Files button at the bottom of the page for the complete Build output.
Build Output Page
The Build Output Page is a resource for all information relating to the build of a BSP/SDK. The page includes a build summary; package sources; individual binary files for the kernel, toolchain, bootloader, and root filesystem; and the desktop factory download.
The build summary, BUILD-SUMMARY.txt, provides a list of configuration and build instructions associated with the platform including the system specifications, kernel and bootloader versions, toolchain components, host build tools, package selections, and root filesystem options. By inspecting the pre-built starting points, phyCORE-Vybrid PD13.0.2, build summary the default/suggested configuration settings can be determined.
5.2 Desktop Factory Build System
The BSP can be built from using the Desktop Factory, setup in Section 4.2.2.
5.2.1 Board Files
All source code is located in the /build-armv7l-timesys-linux-gnueabi/ directory. To integrate and modify features on the system for both driver development and general settings or Carrier Board design, it is necessary to know about the board files summarized by the following:
| Description | File |
|---|---|
| Kernel | linux-3.0/arch/arm/mach-mvf/board-pcm052.c |
| Bootloader | u-boot-2011.12/u-boot-2011.12/board/phytec/pcm052.c |
5.2.2 Make Rules
The Desktop Factory uses the kernel configuration (KConfig) system to include the packages, kernel, and toolchain versions and configurations. Make rules, performed on configuration symbols defined in KConfig, are defined to execute commands for the standard configuration, build, and install processes for the kernel, packages, and toolchain components. Therefore, target commands can be used with make directly on the command line.
For more information see the Make documentation provided by Timesys or use the help make target to view a list describing the common target commands:
make help

Timesys Factory (Released: 20130403)
Host targets:
* checksystem            - Check that the system meets build requirements
* checkupdates           - Check for updates from Timesys
  update                 - Update work order with new defaults from Timesys
  menuupdate             - Menu based update tool
  update-noprompt        - Update work order without prompting for each change
  checktool-oprofile, checktool-ltp,
  checktool-mpatrol, checktool-gdb
                         - Check current configuration for compatibility with
                           tool (oprofile, ltp, etc)
  advice                 - Upload current configuration to the TimeSys server
                           and receive advice about selections

  timestorm-register-toolchain - Register the toolchain with Timestorm

Cleaning targets:
  clean                  - Purge build directories
  download-clean         - Purge source files
  distclean              - Purge build directories, source files and .config
  rfs-distclean          - Reset RFS working directory
  packages-distclean     - Reset package state for selected applications
  software-distclean     - Distclean all selected applications
  reset-toolchain        - Resets the build environment to a pristine toolchain

Per application targets:
  [application]-clean        - Purge build directory
  [application]-distclean    - Purge build and source directories
  [application]-fetch        - Fetch source, patches, and files
  [application]-unpack       - Unpack into working directory
  [application]-patch        - Apply patches to working directory
  [application]-configure    - Configure
  [application]-restage      - reset build status to unbuilt
  [application]-reconfigure  - reset build status to unconfigured
  [application]-build        - Build
  [application]-package      - Generate package
  [application]-rfs-install  - Install to RFS working directory
  [application]-host-install - Install to Host Toolchain
  [application]-show         - display application information
  [application]-select       - add application to current configuration

Kernel Configuration:
  kernel-menuconfig          - call kernel menuconfig (or other *config)

Configuring targets:
  config         - Update configuration file using command-line utility
  menuconfig     - Update configuration file using ncurses utility
  oldconfig      - Update configuration file using current .config as a base
* showpackages   - Show summary of packages selected in current .config
* showoutput     - Show summary of the build output

Fetching targets:
* sources        	- Download all sources and patches required to build selections

Building targets:
* packages       	- Generate packages for all selections
* toolchain      	- Build and package the cross toolchain
* rfs            	- Compile all selections and kernel and create RFS output
* rfs-images    	- Generate RFS images (Called by RFS)
* installer      	- Generate the installer for the custom target SDK

Execute "make" to build all targets marked with [*]
5.2.3 Modifying the Platform
A set of make rules are defined specifically for configuring targets by updating the configuration file. From Config.in files throughout the Desktop Factory, KConfig keys and their values are listed together in a menu to allow straightforward user configuration and customization of the platform. Use themenuconfig make target on the command line in the BSP directory, ex. timesys/pcm052/factory-20130403/, to modify the settings for the platform:
make menuconfig
This menu can be used to customize and configure the platform:

When making modifications, it is recommended to begin with the Target Configuration because of the dependencies other platform configuration have based on the chosen target. The options available in this menu range from architecture and CPU choice to root filesystem image types and target build specifications.
Toolchain specific configuration is provided by the Toolchain Configuration menu including customization for each toolchain component and a selection to either build a toolchain, optionally a native toolchain for the target as well, or fetch an existing pre-built toolchain. To customize the target software that can be included in the platform use the Target Software menu which provides sub menus to the Kernel, Bootloader, and Software Packages. Refer to Configuration System Overview for additional documentation provided by Timesys.
To adjust the drivers and support included in a Linux kernel build, invoke the Linux kernel menuconfig interface:
make kernel-menuconfig
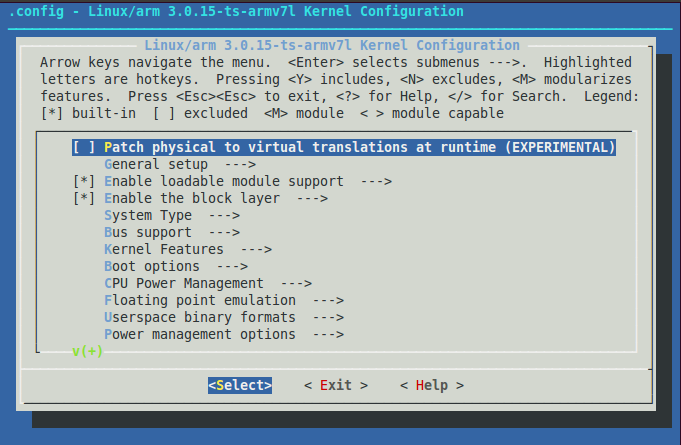
When using menuconfig, the location of a name or token can be searched by using the “/” key:

5.2.4 Building Images
The build system is invoked by executing make targets from the command line in the BSP directory, ex. timesys/pcm052/factory-20130403/. With no targets specified, executing make will build the entire BSP through implementing a set of core Factory targets:
make
Note: See Section 5.2.2 or execute make help, the list of included make targets when executing make will be designated by a ‘*’ mark.
All images are then stored in timesys/pcm052/factory-20130403/build_armv7l-timesys-linux-gnueabi/images.
Build Time Optimizations
The build time will vary depending on the package selection and Host performance. After the initial build when modifications to the same BSP are made, a full build is not required and taking advantage of optimized build options specific to modifications will reduce the build time. For example, from a built BSP, if modifications were made to the bootloader, u-boot could be rebuilt without having to invoke an entire rebuild on the system by performing target application specific commands to reset its build status to unbuilt, then simply build and install the application:
make u-boot-restage
make u-boot-build
make u-boot-host-install
Alternatively, the make command can be run specifically on the u-boot application for the changes to take affect:
make u-boot-restage
make u-boot
Each target application selection has a series of make targets for itself, as can be viewed by per application targets in make help. Alternatively, to view the available make targets for a given application, enter the name, such as u-boot in the command prompt of the BSP directory, ex.timesys/pcm052/factory-20130403/, and hit the TAB key:
make u-boot

u-boot			u-boot-check		u-boot-configure
u-boot-fetch		u-boot-package		u-boot-reconfigure
u-boot-rfs-install	u-boot-build         	u-boot-clean
u-boot-distclean	u-boot-host-install	u-boot-patch
u-boot-restage		u-boot-unpack
5.3 Managing Images
The SDHC card that comes with the phyCORE Vybrid is pre-loaded with kit demo images. After new images are built they can installed on a SD card and run on the target.
To boot the board, the following images will be required:
| File | Name |
|---|---|
| Bootloader | u-boot.imx |
| Linux kernel | uImage-3.0.-ts-armv7l |
| Root Filesystem | rootfs.tar.gz |
If using an SD card that has already been formatted with this script or a similar method, and the bootloader is not changing, skip to the appropriate steps below-- Step 6 if the Linux kernel is changing, or Step 8 if the root filesystem is the only change, and continue the steps from there.
Bootloader
1. Make a script to correctly create and format the card
The following is the contents of a personal script, vybrid_sd_card.sh, that uses the dd command in order to place u-boot.imx on the SD/MMC Card.
#!/bin/bash
if [ $# -ne 2 ]
then
  echo "$0 usage: designate the SD card block device to format (e.g /dev/sdb)
$0 usage: supply the location of u-boot.imx file to flash (e.g. ~/images/u-boot.imx)" 1>&2
  exit 1
elif [ ! "$1" = "/dev/sda" ] ; then
  unset LANG
  DRIVE=$1
  BOOTIMG=$2
  if [ -b "$DRIVE" ] ; then
    dd if=/dev/zero of=$DRIVE bs=1024 count=1024
    parted --script ${DRIVE} mklabel msdos
    dd if=$BOOTIMG of=$DRIVE seek=2 bs=512
    parted --script ${DRIVE} mkpart primary ext2 2 52
    parted --script ${DRIVE} mkpart primary fat32 53 100
    parted --script -- ${DRIVE} mkpart primary ext2 101 "-1"
    mkfs.ext2 ${DRIVE}1 -L boot
    mkfs.vfat ${DRIVE}2 -F 32 -n kernel
    mkfs.ext2 ${DRIVE}3 -L rootfs
  fi
fi
Note: This is a personal script, if executed, a user is at their own risk
2. Determine the SD card device name
The SD card device name is of the form /dev/sd[a|b|c|d|e]. Run the following without and with the SD card connected:
ls /dev/sd*
The device that appeared on the call to ls with the SD card but not the call without is the SD card device.
3. Unmount all partitions of the SD card, using the SD card device name from Step 2:
umount /dev/sd[a|b|c|d|e]*
4. Run the script created in Step 1 specifying the SD card device name from Step 2 and location of the bootloader, u-boot.imx:
sudo ./vybrid_sd_create.sh /dev/sd[a|b|c|d|e] <path to u-boot.imx>/u-boot.imx
5. Mount all partitions
Remove and reinsert the SD card, automount will mount /media/boot, /media/kernel, and /media/rootfs
Kernel
6. If modifying the Linux kernel, remove the existing uImage-3.0-ts-armv7l file:
rm -rf /media/kernel/*
7. Load the new Linux kernel to the SD Card:
cp <path to uImage-3.0-ts-armv7l>/uImage-3.0-ts-armv7l /media/kernel; sync
Root Filesystem
8. If modifying the root filesystem, remove the existing:
sudo rm -rf /media/rootfs/*
9. Load the new filesystem to the SD Card:
sudo tar -zxvf <path to rootfs.tar.gz -C /media/rootfs/; sync
9. Unmount each partition before removing the SD Card:
umount /media/boot /media/kernel /media/rootfs
6 Booting Configurations
6.1 Selecting Boot Modes
The bootloader, one of the key software components included in the BSP, completes the required hardware initializations to download and run operating system images. The boot mode, selected from the S5 dipswitch on the Carrier Board, determines the location of the primary bootloader, u-boot.imx. In this BSP release, SD Card is the only supported boot mode, therefore the S5 switch settings on the Carrier Board should be the following:
S5-1 to S5-4 ONS5-5 to S5-8 OFF

6.2 Basic Settings
After application of power, approximately three seconds are allotted for the user to hit any key which will halt autoboot and enter U-Boot:

Set U-boot's network environment variables to match your required network settings:
setenv ethaddr ##.##.##.##.##.##
setenv ipaddr ###.###.###.###
setenv serverip ###.###.###.##.
setenv gatewayip ###.###.###.###
setenv netmask ###.###.###.###

setenv tftploc <TFTP image location>
setenv nfs_root /<NFS mount location>
ethaddrMAC address for the device. Set this to the MAC ID, which is printed on the sticker on the SOM.
ipaddrA dedicated IP address for the SOM. This is crucial if TFTP will be used for updating the device's images at any point.
serveripIP address of the host or another machine where the TFTP directory, if it exists, is located.
gatewayipGateway IP for the network. This is only necessary if the TFTP directory is located on another network.
netmaskNetmask for the network: typically 255.255.255.0. This is only necessary if the TFTP directory is located on another network.
tftploc (required for TFTP)Location of the path to the images on the TFTP server on the host system, setup in Section 4.1.1. Set the variable accordingly by referencing the following examples:
| File Path | U-Boot Command |
|---|---|
| /var/lib/tftpboot/PHYTEC/Vybrid/PD13.0.2 | setenv tftploc PHYTEC/Vybrid/PD13.0.2 |
| /var/lib/tftpboot | setenv tftploc |
nfs_root (required for NFS)Location of the path to the NFS directory on the host system, setup in Section 4.1.2. For example: /home//phyCORE-NFS
Use the following command to verify the environment variables are set as intended:
pcm052 u-boot> printenv

baudrate=115200
bootargs_base=setenv bootargs rw mem=256M console=ttymxc1,115200n8 init=/sbin/init
bootargs_net=setenv bootargs ${bootargs} root=/dev/nfs ip=dhcp nfsroot=${serverip}:${nfs_root},v3,tcp
bootargs_sd=setenv bootargs ${bootargs} root=/dev/mmcblk0p3 rootwait rootfstype=ext2
bootcmd=run bootcmd_sd
bootcmd_net=run bootargs_base bootargs_net; tftpboot ${loadaddr} ${tftploc}${bootfile};bootm
bootcmd_sd=run bootargs_base bootargs_sd; mmc rescan; fatload mmc 0:2 ${loadaddr} ${bootfile}; bootm ${loadaddr}
bootdelay=3
bootfile=uImage-3.0-ts-armv7l
eth1addr=00:e0:0c:bc:e5:61
ethact=FEC0
ethaddr=00:e0:0c:bc:e5:60
gatewayip=192.168.3.1
ipaddr=192.168.3.10
loadaddr=0x80010000
mem=260096k
netmask=255.255.255.0
nfs_root=/path/to/nfs/root
serverip=192.168.3.11
stderr=serial
stdin=serial
stdout=serial
tftploc=/path/to/tftp/directory
After confirming the environment variables are correct, save them and continue on to the next section to set the correct kernel and rootfs boot location:
saveenv
Note: help is a useful tool in U-Boot to show available commands and usage.
6.3 Stand-Alone Booting
By default, the phyCORE-Vybrid kit is setup to boot the Linux kernel and root filesystem from SD card. If switching from another boot configuration back to SD, use the predefined environment variable to set this mode:
setenv bootcmd 'run bootcmd_sd'
saveenv
6.4 Remote Booting
To configure U-Boot to boot the kernel from TFTP and mount the root filesystem from NFS, set the boot command to use the predefined environment variable with the following command:
setenv bootcmd 'run bootcmd_net'
saveenv