1 About this Quickstart
This document describes how to install and work with the Linux Board Support Package (BSP) for the phyFLEX-i.MX6 platform. This BSP provides a fundamental software platform for development, deployment and execution on the phyFLEX-i.MX6.
The Quickstart contains instructions for:
- Getting Started
- Host Setup
- Building a BSP
- Booting Configurations
- Flashing images
2 System Requirements
2.1 Hardware
- phyFLEX-i.MX6 System on Module (PFL-A-02)
- phyFLEX-Mapper i.MX6 (FLM-A-XL1)
- phyFLEX Carrier Board (PBA-B-01)
- Serial cable (RS-232)
- Ethernet cross-over cable
- AC adapter supplying 12 VDC / min. 2 A
- 5", 7", 10.4" VGA LVDS (optional)
2.2 Software
To successfully build a customized Linux distribution using PTXdist, your host machine must be running a modern GNU/Linux Operating System either natively or via a virtual machine. This Quickstart was authored and tested with Ubuntu 12.04 LTS 32-bit Virtual Machine on a Windows 7 Host PC.
3 Getting Started
This section is designed to get the board up-and-running with the demo images included in the kit.
3.1 Making Connections
Make all required connections and then apply power to begin booting the device.
1. (optional) Connect the serial cable between UART_0 DB9 (X51) and host - 115200 baud, 1 start bit, 8 data bits, 1 stop bit, no parity, no flow control
2. (optional) Connect the Ethernet cable to the RJ-45 connector (X28) and appropriate network card on the host
3. (optional) Connect the LCD power and data connectors at X65
4. (optional) Connect a USB keyboard or mouse to the USB Standard A port (X45)
5. Connect the 12 V supply to the 12V_DC jack (X12)
Locations of the corresponding ports for Steps 1-5 are depicted in the following:

3.2 Kit Demos
After the target boots, Linux will be entered. A serial connection is recommended for all demos to interact with the kit and at least ensure proper shutdown. Additionally, connect a LCD to run fluid launcher, a Qt demo application launcher for embedded platforms.
Serial Communication
Requires a connected serial cable -- See Step 1
Open a terminal, such as TeraTerm (Windows) or Minicom (Linux), and setup a serial port connection.
Follow the instructions below to enable Minicom on your Linux host:1. Install Minicom via a terminal
/* if Minicom is not installed */
sudo apt-get install minicom
2. Start Minicom from the terminal:
minicom -c on -s
3. From the Minicom main menu, navigate to "Serial port setup" in the Minicom. Press Enter.4. Verify the line A - Serial Device : reads the proper serial port, ex. /dev/ttyS05. Modify the line E - Bps/Par/Bits : to have a speed of 115200 and 8-N-1 (8N1) for the stop bits.6. Press Enter to return to the main menu7. Press Esc to exit this menu
After providing power with Step 5, the system will boot into Linux.
Login as root and begin using the Linux command prompt.

When finished with the kit demo, from the Linux command line use the reboot command to restart, or the poweroff command to shutdown the system. Please note that failure to use these commands to end a session could result in a corrupted filesystem.
Fluid Launcher
- Requires a connected LCD -- see Step 3
- Highly recommended serial connection -- see Step 1 and serial communication above
- Recommended USB keyboard and mouse -- see Step 4
After providing power with Step 5, the system will boot into Linux and run fluid launcher.
Note: The default images boot directly into the fluid launcher. If the filesystem has been modified/rewritten, the system will run ts_calibrate before loading fluid launcher. Press the boxes on the screen as they appear to calibrate the touchscreen controller.
Interact with the fluid launcher on the display by touching the screen to browse through applications. When an application is highlighted, positioned in the center of the main screen and name displayed above the icon, simply clicking on it will open the application. Fluid launcher contains the following applications:
- Calculator
Use the calculator application to perform basic arithmetic. Enter operations by touching the screen or using a USB mouse or keyboard.
- Calendar
By month calendar display. Customize the view with formatting options.
- Image Viewer
View an image of choice and adjust the viewing perspective once it is loaded.
- Scribble Paint
The Scribble Paint application allows a user to draw an image in real time as well as to open and edit an existing image. Use the Options menu to select the pen width and color and begin drawing by touching the screen or clicking on the open area using a USB mouse. The following file types are supported: bmp, ico, jpeg, png, ppm, xbm, and xpm.
- Spreadsheet Application
Customized table that supports dynamic content in cells. Supports addition of two cells, subtraction of one cell from another, multiplication of two cells, dividing one cell from another, and summing contents from an arbitrary number of cells.
- Game of Tetrix
Qt version of the classic Tetrix game. The goal of the game is to fill every square in a row to clear a line. As blocks are dropped from the top of the playing area, move, rotate, and stack the blocks to fill entire rows at the bottom of the playing area. To control the blocks, connect a USB keyboard:Left cursor - move the piece one space to the leftRight cursor - move the piece one space to the rightUp cursor - rotates the piece 90 degrees counter-clockwiseDown cursor - rotates the piece 90 degrees clockwiseD - immediately move the piece down by one rowSpace - drop a piece as close to the bottom of the board as possibleUse the buttons to control the game flow, press Start to begin; Quit to end; and Pause to freeze the game but retain its state.
- Rich-Text Editor
The Text Edit demonstration shows Qt's rich text editing facilities in action, providing an example document to experiment with. Connect a USB keyboard and mouse to insert and format text.
- Wiggly Animated Text
This example demonstrates how to animate text. Use a USB keyboard to dynamically modify the text displayed.
- Exit Embedded Demo
Exit fluid launcher. The demo can be relaunched by running the following from the Linux command line:
fluidlauncher &
Note: Some applications display a Help menu in the toolbar, click on this to learn more about what Qt classes were used.
If necessary, recalibrate the touchscreen from the Linux command line:
ts_calibrate
When finished with the kit demo, use the reboot command to restart, or the poweroff command to shutdown the system. Please note that failure to use these commands to end a session could result in a corrupted file system.
4 Host Setup
The phyFLEX-i.MX6 (PFL-A-02) has been developed and tested with Ubuntu 12.04 LTS Precise Pangolin [Installation Guide]. Although it is possible to use a different OS, some setup information will contain OS-specific commands and paths for settings.
Update repositories and upgrade installed packages:
sudo apt-get update
sudo apt-get upgrade
4.1 Server Setup
Support for installing and setting up TFTP, NFS, and Samba server settings to enable communication between multiple systems and the target.
4.1.1 TFTP
TFTP allows files to be downloaded from one machine to another. With most embedded Linux devices, TFTP is an efficient way to boot the kernel during development so that the user does not have to flash a new kernel every time it is modified. It is also helpful when updating images in flash from Barebox.
First, start by installing the TFTP server.
sudo apt-get install tftpd-hpa
Next, files can be accessed from another machine on the same network by simply using the IP address of the host. Specify a folder where the files will reside on the host by replacing the folder path for TFTP_DIRECTORY with whatever folder you wish to use as your TFTP file storage location, or leave the folder as the default.
sudo gedit /etc/default/tftpd-hpa

# /etc/default/tftpd-hpa

TFTP_USERNAME="tftp"
TFTP_DIRECTORY="/var/lib/tftpboot"
TFTP_ADDRESS="0.0.0.0:69"
TFTP_OPTIONS="--secure"
If you made any changes to the settings of the TFTP server, you need to restart it for them to take effect.
sudo restart tftpd-hpa
Lastly, if you would like to grant every user on the system permission to place files in the TFTP directory, use the following command, replacing <TFTP_DIRECTORY> with your chosen location.
sudo chmod ugo+rwx <TFTP_DIRECTORY>
4.1.2 NFS
A network file-system (NFS) server gives other systems the ability to mount a file-system stored on the host and exported over the network. In embedded development, this is essential for quickly testing applications and evaluating different file-system setups.
To begin the installation process use the following command:
sudo apt-get install nfs-kernel-server
Exported filesystems are designated in the "/etc/exports" file and allow you to choose both the directory to be exported and many settings for accessing the exports. Below is an example for exporting a folder called "nfs_export-ex" located in a user's home directory.
sudo gedit /etc/exports

# /etc/exports

/home/<user>/nfs_export-ex  *(rw,sync,no_root_squash,no_subtree_check)
The options (rw, sync, no_root_squash, no_subtree_check) for this folder are essential in setting up the NFS export correctly. For more information on additional options, refer to the man page for 'exports'.
rw enables
read and write access when the directory is mounted
sync
tells the file-system to handle local access calls before remote access
no_root_squash
allows root access when mounting the file-system
no_subtree_check
reduces the number of checks the server must make to ensure that an exported sub-directory is within an exported tree and also enables access to root files in conjunction with no_root_squash
After modifying this file, in order to mount the directories as an NFS, you must force the NFS server to export all of the directories listed in "/etc/exports".
sudo /usr/sbin/exportfs -va
4.1.3 Samba
Samba servers are an excellent way to access a Linux file-system on a Windows machine via a network connection. Using a Samba server, it is quick and easy to transfer files between systems. To install a Samba server, use the following command:
sudo apt-get install samba
Before the Samba share can be mounted on another machine it's necessary to modify the configuration file to allow write access and access to home directories. Start by editing the "/etc/samba/smb.conf" file.
sudo gedit /etc/samba/smb.conf
Inside this file there are four specific things that need to be uncommented (remove the ';' at the beginning of the line) to enable the sharing of home folders and write access. Below is the section that must be modified:
#======================= Share Definitions =======================

# Un-comment the following (and tweak the other settings below to suit)
# to enable the default home directory shares. This will share each
# user's home directory as \\server\username
;[homes]
;   comment = Home Directories
;   browseable = yes

# By default, the home directories are exported read-only. Change the
# next parameter to 'no' if you want to be able to write to them.
;   read only = no
The outcomes after the changes are made follow:
#======================= Share Definitions =======================

# Un-comment the following (and tweak the other settings below to suit)
# to enable the default home directory shares. This will share each
# user's home directory as \\server\username
[homes]
   comment = Home Directories
   browseable = yes

# By default, the home directories are exported read-only. Change the
# next parameter to 'no' if you want to be able to write to them.
   read only = no
NOTE: It might also be necessary to change the "workgroup = " line to match the workgroup for your machine.
To apply the changes, the next step is to restart all Samba-related processes.
sudo restart smbd
sudo restart nmbd
Lastly, each user needs to have a password enabled to be able to use the Samba server. There are no rules for this password. The simplest method for choosing this password is to make it the same as the UNIX user's password, but it is not a requirement. After typing in the command below, you will be prompted to enter the password for the specified user.
sudo smbpasswd -a <user>
As mentioned in the configuration file, the samba share can be connected by accessing "\\<host machine ip>\\<user>" by either mounting a network share or using Windows explorer to navigate to it.
4.2 PTXdist
4.2.1 General Information
PTXdist is a set of tools created by Pengutronix to help manage all of the BSP sources, from x-loader to the filesystem and its applications. It makes it easier for a user to manage everything for specific platforms and toolchains without manually repeating relatively complex commands every time it is necessary to build a new image. It is important to note the PTXdist version because more than one may be necessary for building the toolchain and BSP.
4.2.2 Extracting Sources
Visit the phyFLEX-i.MX6's BSP page for information on the current versions of BSP tools.
Potentially, two versions of PTXdist will need to be downloaded:
- ptxdist-2011.11.0 for installing/constructing the cross-compile toolchain (Optional if using a pre-existing environment)
- ptxdist-2012.03.0 for building the BSP with the toolchain mentioned above.
The following instructions correspond to downloading PTXdist for building the BSP, ptxdist-2012.03.0. Therefore, to download the PTXdist software for building the toolchain, ptxdist-2011.11.0, repeat the instructions replacing 2012.03.0 with 2011.11.0. In order to be built, extract the archive containing the PTXdist software:
tar -jxvf ptxdist-2012.03.0.tar.bz2
cd ptxdist-2012.03.0
Now that the source has been extracted, the next step is to configure it for building.
4.2.3 Pre-Requisites
PTXdist checks for specific packages that must be installed before it can be successfully built. From the PTXdist source directory, ptxdist-2012.03.0, execute the command to begin a script that uses GNU autotools to help set up the environment for building the distribution.
./configure
This command automatically stops if it is missing a package and states why and what package to install to continue with the initial setup. After successfully running the configure script, build and install PTXdist.
From the PTXdist source directory, ptxdist-2012.03.0:
make
sudo make install
The install location is "/usr/local" by default, which is why the make install command must be run with root privileges. If another directory is preferred for the install, use the --prefix option when installing, but be sure to add the "bin/" directory of the installed tools in this new folder to $PATH by modifying and sourcing ~/.bashrc.
source ~/.bashrc
Now that the install is complete, the PTXdist folder can be removed, as well as the original archive.
Optional:
cd ..
rm  -rf ptxdist-2012.03.0*
4.2.4 Using PTXdist
PTXdist is a console command tool and different functions are run by extending parameters to the ptxdist base command.
ptxdist <parameter>
To generate a full list of parameters and a description of the function, use the help command:
ptxdist help
Since PTXdist versions can be installed in parallel it may be useful to view the version number corresponding to the ptxdist command:
ptxdist --version
If the output of this command does not correlate to the desired version of PTXdist, affix the ptxdist command with the version number. For example, for the phyFLEX-i.MX6 BSP, affix all ptxdist commands with 2012.03.0 resulting in ptxdist-2012.03.0:
ptxdist-2012.03.0 <parameter>
Alternatively, to correlate the ptxdist command with a specific version create a symbolic link. For example, for ptxdist to correlate to ptxdist-2012.03.0:
sudo ln -fs /usr/local/lib/ptxdist-2012.03.0/bin/ptxdist /usr/local/bin/ptxdist
- Wrong PTXdist Version
It is important to use the correct version of PTXdist when building the Toolchain or BSP. If the incorrect version is used, the following will result:
error: The ptxconfig file version and ptxdist version do not match:configfile version: 2012.03.0ptxdist version: 2011.11.0
You can either migrate from an older ptxdist release with:'ptxdist migrate'
or, to ignore this error, add '--force'to ptxdist's parameters, e.g.:'ptxdist --force go'
The version of PTXdist used is noted as ptxdist version where the one required is specified as configfile version. Therefore, rerun the command with the correct version either appended to ptxdist or create a symbolic link. If the merge or force options were used on the Toolchain or BSP they will need to be removed and reinstalled to be built with the correct PTXdist version. Please note that the above is a generic example and may not apply directly to your BSP.
4.2.4.1 Setup
The first time PTXdist is used, there are some setup properties that have to be configured. To run PTXdist's setup, use the following command:
ptxdist setup
Once in the ptxdist setup, the only settings that should be modified are the User->Name and User->eMail. This is mainly for general logging purposes. If you wish to modify any other settings, please refer to the Getting Help section for a link to PTXdist documentation.
Since PTXdist works with sources only, it needs to grab source archives from the web using wget as it advances through its setup if they do not exist already. Therefore, an internet connection is required.
4.3 Toolchains
In order to build images or applications for an embedded device, it is necessary to have a cross toolchain that will perform the necessary operations to compile code for a specified processor and system setup.
Each toolchain will have a modified GNU Compiler Collection (gcc) designed for the desired setup. The phyFLEX-i.MX6 PD13.1.1 uses the arm-cortexa9 toolchain which can be built from the OSELAS.Toolchain-2011.11.1 and ptxdist-2011.11.0 sources.
4.3.1 Existing Toolchains
If a working toolchain is already installed for a given architecture, it is possible to use this instead of building an OSELAS Toolchain. Do note that since external toolchains have not been tested it is possible that they may not work properly across all environments.
An extra step needs to be taken if the plan is to use an external toolchain. By default, the software package will be set to check for the vendor toolchain that it was compiled with. In order to change this, use the following command inside the root directory of the BSP:
ptxdist platformconfig
    architecture --->
        toolchain --->
            () check for specific toolchain vendor
4.3.2 Building OSELAS Toolchains
An OSELAS toolchain, managed by PTXdist, can be easily built for a target architecture.
For the phyFLEX-i.MX6, the arm-cortexa9 architecture based toolchain is built from OSELAS.Toolchain-2011.11.1 [Here] and PTXdist 2011.11.0 [Here]. See Section 2.2 for information regarding the installation of PTXdist sources.
tar -jxvf OSELAS.Toolchain-2011.11.1.tar.bz2
cd OSELAS.Toolchain-2011.11.1
Be sure to use the correct ptxdist version for the toolchain by affixing all ptxdist commands with 2011.11.0 resulting in ptxdist-2011.11.0 or see Section 2.2.4 for information on creating a symbolic link between ptxdist and ptxdist-2011.11.0.
ptxdist select ptxconfigs/arm-cortexa9-linux-gnueabi_gcc-4.6.2_glibc-2.14.1_binutils-2.21.1a_kernel-2.6.39-sanitized.ptxconfig
ptxdist go
The toolchain is now built and installed in /opt/OSELAS.Toolchain-2011.11.1/arm-cortexa9-linux-gnueabi and ready to be used for building the BSP.
If you wish to build applications outside of the BSP directory, add the toolchain location to your PATH. Use the following from the command line or permanently add to your PATH by including it in .bashrc:
PATH=/opt/OSELAS.Toolchain-<toolchain version>/arm-<processor>-linux-gnueabi_gcc-linaro-<version>_glibc-<version>_binutils-<version>_kernel-<version>-sanitized/bin/:$PATH
Following a successful build, the OSELAS.Toolchain-2011.11.1 folder can be removed, as well as the original archive.
Optional:
cd ..
rm  -rf OSELAS.Toolchain-2011.11.1*
4.3.2.1 Protecting Toolchains
It is recommended, although optional, to set the /opt/OSELAS.Toolchain-2011.11.1/arm-cortexa9-linux-gnueabi directory and its contents as read-only to prevent accidental modifications to the toolchain.
4.4 Eclipse
Eclipse is a software development environment that offers extended functionality by plug-in integration. Install Eclipse and the C/C++ Development Toolkit (CDT) plug-in to write, build, and debug C/C++ code.
sudo apt-get install eclipse
Open Eclipse from the command line and specify a workspace for storing Eclipse settings and projects, ex. /home/<user>/workspace.
eclipse &
Eclipse is now started and the CDT plug-in can be integrated.
- From the Eclipse menu bar, select Help -> Install New Software...
- In the Work with: text bar, enter http://download.eclipse.org/tools/cdt/releases/galileo/
- Click Add
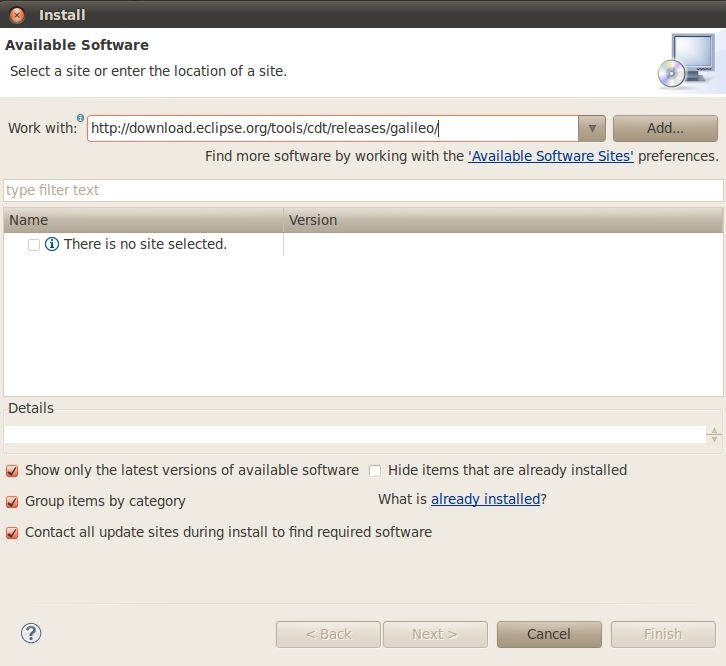
- Check CDT Main Features from the list of available software
- Click Next

- Review the install details
- Click Next
- Review and accept the terms of the license agreements
- Click Finish
- Restart Eclipse to apply changes
The CDT plug-in is now installed and programming in C/C++ is supported in the Eclipse environment.
4.4.1 Additional Plug-ins
Qt Integration
Setup of the Qt plug-in in Eclipse requires files located in <bsp_install_dir>/platform-phyFLEX-i.MX6/. These files are not generated until after a successful build of the BSP -- see Section 6 for additional information.
Download and extract the Qt Eclipse plug-in Here to /usr/lib.
tar -xvzf qt-eclipse-integration-linux.x86-1.6.1.tar.gz -C /usr/lib
Install the Qt plug-in in Eclipse:
- Open Eclipse with the clean option, which cleans any cached data
eclipse --clean &
- From the Eclipse menu bar, select Window -> Preferences
- From the navigation menu on the left, click Qt
- Click Add
- Enter the following:
Version Name: QT_phyFLEX-i.MX6Bin Path: /platform-phyFLEX-i.MX6/sysroot-cross/binInclude Path: /platform-phyFLEX-i.MX6/sysroot-host/include
- Click Finish

5 Debugging
This section provides an example of using Eclipse to debug a HelloWorld Linux application, downloadable from the PHYTEC FTP, using aGNU debugger GDB via a TCP/IP network connection.
From the Linux command line on the target: Setup the remote settings
- Open a terminal on the host, such as TeraTerm (Windows) or Minicom (Linux), and setup a serial port connection -- see Serial Communication
- Connect a serial cable -- see Step 1
- Connect a Ethernet cable -- see Step 2
- Power the device -- see Step 5
- Login as root
- View current network settings. The IP address will be used to communicate with the target in Eclipse:
ifconfig eth0
The network settings can be modified. Set the IP address and, if the device is outside the network, the gateway IP address.
ifconfig eth0 ###.###.###.###
route add default gw ###.###.###.###
From Eclipse on the host: Open the HelloWorld demo
- From the menu bar, click File -> Import
- Select General -> Existing Projects into Workspace
- Click Next
- With the Select root directory: option selected, browse to the HelloWorld directory
- Click OK
- Select HelloWorld from the Projects: menu
- Click Finish

From Eclipse on the host: Build the application
- In the Project View Window, right click on the HelloWorld project
- Select Properties
- From the navigation menu on the left, click C/C++ Build -> Settings
- On the Tool Settings tab, enter the following:
GCC C Compiler -> Command: arm-cortexa9-linux-gnueabi-gccGCC C Linker -> Command: arm-cortexa9-linux-gnueabi-gccGCC Assembler -> Command: arm-cortexa9-linux-gnueabi-as
- On the Build Steps tab, in the Post-build steps modify the Command field to reflect the target IP Address (###.###.###.###)
scp ./HelloWorld root@###.###.###.###:/home/. ;ssh root@###.###.###.### ./HelloWorld
- Click OK

- In the Project View Window, right click on the HelloWorld project
- Select Build Configurations -> Set Active -> Debug
- In the Project View Window, select the HelloWorld project
- From the menu bar, click Project -> Build Project
The Linux application, HelloWorld, will be copied to the /home/ directory of the root filesystem on the target.
From the Linux command line on the target: Start the GDB server
- From the Linux command line enter the following, where ###.###.###.### is the IP address of the target:
gdbserver ###.###.###.###:10000 HelloWorld

The GDB server has been started on the target, it is now waiting for connections on the TCP port 10000.
From Eclipse on the host: Setup the debug configuration
- In the Project View Window, right click on the HelloWorld project
- Click Debug As -> Debug Configurations…
- From the navigation menu on the left, expand C/C++ Application
- Select HelloWorld
- On the Debugger tab, select from the Debugger drop-down menu gdbserver Debugger
- From the Main tab under Debugger Options, under GDB debugger: select Browse...
- Browse to the location of the cross toolchain, if built in Section 4.3 /opt/OSELAS.Toolchain-2011.11.1/arm-cortexa9-linux-gnueabi/gcc-4.6.2-glibc-2.14.1-binutils-2.21.1a-kernel-2.6.39-sanitized/bin/arm-cortexa9-linux-gnueabi-gdb
- Clear the text under GDB command file:

- From the Connection tab under Debugger Options, select from the Type: drop-down menu TCP and enter the IP address of the target
- Click Apply

- Launch and debug the demo application from the Debug Configurations menu by clicking Debug.

Automatically, Eclipse is switched into the debug perspective and the debugger stops automatically at the first line and the host's GDB is now connected to the GDB server on the target. The debug configuration, HelloWorld [C/C++ Application], in the Debug control window displays the current state of the application. Continue using the Eclipse debugger to set breakpoints, step through a project, watch and change content of variables, and use the memory monitor to view the content at a memory address.
6 Building the BSP
Management of the phyFLEX-i.MX6 BSPs is provided by PTXdist version 2012.03.0. If a symbolic link was not created between ptxdist and ptxdist-2012.03.0 affix all ptxdist commands with 2012.03.0 resulting in ptxdist-2012.03.0, see Section 2.2 for additional information on using PTXdist.
6.1 PTXdist Project Setup
Download and extract the BSP, BSP-Phytec-phyFLEX-i.MX6-<release-version>.tar.gz, available on the PHYTEC FTP.
Note: Replace <release-version> with the BSP release version downloaded, ex. for phyFLEX-PD13.1.1 BSP release, replace BSP-Phytec-phyFLEX-i.MX6-<release-version> with BSP-Phytec-phyFLEX-i.MX6-PD13.1.1.
tar -xvzf BSP-Phytec-phyFLEX-i.MX6-<release-version>.tar.gz
cd BSP-Phytec-phyFLEX-i.MX6-<release-version>
Use the pre-defined ptxconfig to select a software platform and select phyCORE-i.MX6 for the hardware platform.
ptxdist-2012.03.0 select configs/ptxconfig
ptxdist-2012.03.0 platform configs/phyFLEX-i.MX6/platformconfig
PTXdist should automatically detect the toolchain:
found and using toolchain:
'/opt/OSELAS.Toolchain-2011.11.1/arm-cortexa9-linux-gnueabi/gcc-4.6.2-glibc-2.14.1-binutils-2.21.1a-kernel-2.6.39-sanitized/bin'
Note: If the toolchain was not installed in the OSELAS.Toolchain() default location, PTXdist will not automatically detect it. The toolchain will need to be selected manually, see PTXdist User Manual Section 3.2.4 for additional information.
6.2 Managing Configurations
All source code is located in the BSP-Phytec-phyFLEX-i.MX6-<release-version>/platform-phyFLEX-i.MX6/build-target directory. To help integrate and modify features on the system for both driver development and general settings or carrier board design, it is necessary to know about the files summarized by the following:
- Linux Kernel Source (linux-3.0.35/)
Board File: linux-3.0.35/arch/arm/mach-mx6/board-mx6q_phyflex.c
- Barebox Source (barebox-2012.02.0)
Board File: barebox-2012.02.0/arch/arm/boards/phyflex-imx6/board.cDefault Configuration File: barebox-2012.02.0/arch/arm/boards/phyflex-imx6/env/config
Note: The files located in <bsp_install_dir>/platform-phyFLEX-i.MX6/ are not generated until after the first successful build of the BSP.
PTXdist uses the kernel configuration, KConfig, files present throughout the BSP for straightforward user configuration of individual settings and drivers. The platform, kernel, and project’s root filesystem configuration menus will be the most beneficial.
6.2.1 Platform
The platform configuration menu contains the default settings for each platform including what bootloaders, kernel, and filesystem images are to be built and located.
ptxdist-2012.03.0 platformconfig

6.2.2 Kernel
The kernel configuration menu allows the user to adjust the drivers and support included in a Linux kernel build.
ptxdist-2012.03.0 kernelconfig

6.2.3 Root Filesystem
Configuration of the project’s filesystem can be done in the overall menuconfig. By toggling the options in the base configuration, the applications and content built into the filesystem can be modified directly. This allows both minimal and more complete filesystem builds to be created easily.
ptxdist-2012.03.0 menuconfig

6.3 Building Images
Building and creating images with PTXdist is very simple. All the required steps to download sources and build packages in the correct order are done using the ptxdist go command. Following a successful build, the ptxdist images command will create images to deploy on the target.
ptxdist-2012.03.0 go
ptxdist-2012.03.0 images
The build process relies on obtaining source information from the web, therefore in some cases the content to be downloaded may no longer exist and ptxdist go will fail. If this occurs, check the PHYTEC ftp-server via ftp://ftp.phytec.de/pub/BSP_PACKAGES/EXTERNALS for an alternative download link for the file as it appears in the build output. Download the file and place it in BSP-Phytec-phyFLEX-i.MX6-<release-version>/src directory in its compressed form. After that, restart the build process by calling ptxdist go again. If the package is not available on the FTP, please contact support@phytec.de. We will then take it from our buildserver and upload it onto our ftp-server for you.
It is also possible that ptxdist will download a file that is claimed to be an archive but then is unable to decompress it. This is because the link didn’t deliver the requested archive, but rather HTML containing a message like: “Error - This file has been moved to ...”. Please treat this case in the same way as stated above.
All images are stored in BSP-Phytec-phyFLEX-i.MX6-<release-version>/platform-mx6/images.
7 Managing Images
The phyFLEX-i.MX6 is pre-loaded with kit demo images in Flash. Images located on the PHYTEC FTP or built images can be run on the target.
To boot the board, the following images will be required:
| File | Name |
|---|---|
| Bootloader | barebox-image |
| Default environment | barebox_default_env |
| Linux kernel | uImage-pfla02 |
| Root Filesystem | root.ubi (NAND or NOR Flash) root-pfla02.tgz (SD Card) |
If using a SD card that has already been formatted skip to the appropriate steps below -- Step 5 if the Linux kernel is changing or Step 7 if the root filesystem is the only change and continue the steps from there.
1. Determine the SD card device name
- The SD card device name is of the form /dev/sd[b|c|d|e]. Run the following without and with the SD card connected:
ls /dev/sd*
- The device that appeared on the call to ls with the SD card but not the call without is the SD card device.
2. Unmount all partitions of the SD card, using the SD card device name from Step 1:
umount /dev/sd[b|c|d|e]*
3. Make two partitions on the SD card using fdisk from the Linux kernel, specifying the SD card device name from Step 1:
sudo fdisk -ls

Command (m for help): o
Building a new DOS disklabel with disk identifier 0x2fe3ef94.
Changes will remain in memory only, until you decide to write them.
After that, of course, the previous content won't be recoverable.
- Create a new primary partition (n command) with partition id C, leaving 8 MB of free space at the beginning of the card:
Command (m for help): n
Partition type:
   p   primary (0 primary, 0 extended, 4 free)
   e   extended
Select (default p): p
Partition number (1-4, default 1): 1
First sector (2048-7626751, default 2048): 17432
Last sector, +sectors or +size{K,M,G} (17432-7626751, default 7626751): 1267432

Command (m for help): t
Partition number (1-4): 1
Hex code (type L to list codes): C
Changed system type of partition 1 to c (W95 FAT32 (LBA))
- Create a new Linux partition (n command) with partition id 83
Command (m for help): n
Partition type:
   p   primary (1 primary, 0 extended, 3 free)
   e   extended
Select (default p): p
Partition number (1-4, default 2): 2
First sector (2048-7626751, default 2048): 1267433
Last sector, +sectors or +size{K,M,G} (1267433-7626751, default 7626751):
Using default value 7626751

Command (m for help): t
Partition number (1-4): 2
Hex code (type L to list codes): 83
- Write the partition table to the card (w command) which will destroy all data on the SD card
Command (m for help): w
The partition table has been altered!

Calling ioctl() to re-read partition table.

WARNING: If you have created or modified any DOS 6.x
partitions, please see the fdisk manual page for additional
information.
Syncing disks.
- Create a filesystem on the partitions from the Linux command line:
sudo mkfs.vfat /dev/sd[b|c|d|e]1 -F 32 -n boot
sudo mkfs.ext3 /dev/sd[b|c|d|e]2 -L rootfs
4. Mount all partitions
Remove and reinsert the SD card, automount will mount /media/kernel and /media/rootfs
Kernel
5. If modifying the Linux kernel, remove the existing uImage-3.0-ts-armv7l file:
rm -rf /media/boot/*
6. Load the new Linux kernel to the SD Card:
cp <path to uImage-pfla02>/uImage-pfla02 /media/boot; sync
Root Filesystem
7. If modifying the root filesystem, remove the existing:
sudo rm -rf /media/rootfs/*
8. Load the new filesystem to the SD Card:
sudo tar -zxvf <path to rootfs.tgz> -C /media/rootfs/; sync
9. Unmount each partition before copying the bootloader or removing the SD Card:
umount /media/boot /media/rootfs
Bootloader
10. Use the dd command to copy barebox-image to the SD Card:
dd if=barebox-image of=/dev/sd[b|c|d|e] bs=512 skip=2 seek=2
11. Use the dd command to copy the barebox default environment to the SD Card:
dd if=barebox_default_env of=/dev/sd[b|c|d|e] bs=512 seek=4096
8 Booting Configurations
8.1 Selecting Boot Modes
The bootloader, one of the key software components included in the BSP, completes the required hardware initializations to download and run operating system images. The boot mode, selected from the S3 dipswitch on the Carrier Board, determines the location of the primary bootloader. Set the S3 switches correspondingly:
SPI NOR
S3-1 ONS3-2, S3-3, S3-4 OFF

SD Card
S3-1, S3-2 ONS3-3, S3-4 OFF

8.2 Basic Settings
After application of power, approximately three seconds are allotted for the user to hit any key which will halt autoboot and enter Barebox.

Note: help is a useful tool in Barebox to show available commands and usage.
Use the Barebox configuration file to modify environment variables, select boot settings, and setup networking parameters.
edit /env/config
8.2.1 Network Settings
serverip=###.###.###.###

eth0.ipaddr=###.###.###.###
eth0.netmask=###.###.###.###
eth0.gateway=###.###.###.###
eth0.serverip=###.###.###.###
eth0.ethaddr=##:##:##:##:##:##

kernel_loc=<tftp|disk|nor|nand>
rootfs_loc=<net|disk|nor|nand>
rootfs_type=<ext3|jffs2|ubifs>

nfsroot=$serverip:<NFS mount location>
- ipaddr
A dedicated IP address for the SOM. This is crucial if TFTP will be used for updating the device's images at any point.
- netmask
Netmask for the network: typically 255.255.255.0. This is only necessary if the TFTP directory is located on another network.
- gateway
Gateway IP for the network. This is only necessary if the TFTP directory is located on another network.
- serverip
IP address of the host or another machine. serverip corresponds to where the NFS directory, if it exists is located; eth0.serverip corresponds to where the TFTP directory, if it exists, is located.
- ethaddr
MAC address for the device. Set this to the MAC ID, which is printed on the sticker on the SOM.
- nfsroot
Location of the path to the NFS directory of the host or another machine, setup in Section 4.1.2. For example: /home//phyCORE-NFS
8.2.2 Boot Settings
By default, the phyFLEX-i.MX6 kit is setup to boot the Linux kernel and root filesystem from NAND. Boot settings are determined by the following environment variables:
kernel_loc=nand
rootfs_loc=nand
rootfs_type=ubifs
- kernel_loc
Specifies the location of the Linux kernel. Set this to be:tftp - To boot the Linux kernel via TFTPnor - To boot the Linux kernel from NORnand - To boot the Linux kernel from NAND (default)
- rootfs_loc
Specifies the location of the root filesystem. Set this to be:net - To mount the root filesystem via NFSnor - To mount the root filesystem from NOR Flashnand - To mount the root filesystem from NAND Flash (default)
- rootfs_type
Specifies the root filesystem type. Set this depending on the location of the root filesystem:ext3 - If rootfs_loc=diskubifs - If rootfs_loc=nand or rootfs_loc=nor (default)
8.2.3 Display Settings
By default the system is set to support the 7" EDT display with capacitive touch and adapter board, ETM0700G0DH6 (LCD-018-070KAP). To select a different display, in the Displays section uncomment the LCD selected and comment out the remaining by placing a '#' at the beginning of the line.
# Displays
#display=Primeview-PD050VL1
#display=Primeview-PD035VL1
#display=Primeview-PD104SLF
#display=Primeview-PM070WL4
display=ETM0700G0DH6
8.2.4 Saving Configurations
From the configuration file, return to the Barebox prompt by pressing CTL+D to apply changes or CTL+C to cancel. To retain changes, at the Barebox prompt save the environment.
saveenv
8.3 Booting Options
From the Barebox prompt, continue the boot process using the locations for the Linux kernel and root filesystem defined in the configuration file.
boot
This command also allows the user specify the location of the kernel and root filesystem without modifying the configuration file.
boot [-m <mode>] [-k <kernel_option>] [-r <rootfs_option>] [-i <ip_mode>] [-o <oftree_option>]
Note: By typing _boot_help in the barebox prompt, a summary of the syntax, options, and parameters are provided.
The following provides examples to show the different uses of the boot command.
| Description | Kernel | Root Filesystem | Command |
|---|---|---|---|
| Fixed kernel and root filesystem, same location | TFTP | NFS | boot -m net |
| Fixed kernel, default root filesystem | NAND | default | boot -k nand |
| Default kernel and fixed root filesystem | default | NFS | boot -r net |
| Fixed kernel and root filesystem, different location | TFTP | NOR | boot -k net -r nor |
Note: The rootfs_type parameter will need to be modified prior to running the boot command.
9 Flashing Images
Images that were built or the example images located on the PHYTEC America FTP [Here] can be flashed to the NAND or NOR Flash on the target from a TFTP server using the Barebox command line.
- Make a serial connection, see Step 2 and Serial Communication
- Connect an Ethernet cable, see Step 3
- Power the target, see Step 5
- Halt autoboot and enter Barebox
- Verify the network settings in the environment configuration file
eth0.ipaddr, eth0.serverip, eth0.netmask, and eth0.gateway should match that of the TFTP server
- Use the Barebox update command to download an image from the TFTP server, erase the required amount of flash, and then write the image from RAM into the flash.
update -t <kernel|rootfs|barebox|bareboxenv|xload|oftree> -d <nor|nand> [-m tftp|xmodem] [-f imagename] –c
Note: Enter _update_help or update in the Barebox prompt to generate a summary of the syntax, options, and parameters.
- If the bootloader, Barebox or the Barebox default environment, was updated reboot the target for the changes to take effect.
reset
9.1 Barebox
A valid barebox-image must be available on the TFTP server, <TFTP_DIRECTORY>/phyFLEX-iMX6/images.
Note: Use caution when updating Barebox. If it is not updated with a valid image, the target will not boot and since SD Card boot is not supported it will be difficult to rectify.
NOR Flash
update -t barebox -d nor -m tftp -f phyFLEX-iMX6/images/barebox-image
9.2 Barebox Default Environment
To restore the default Barebox environment, simply delete the Barebox environment partition.
NOR Flash
erase /dev/env0
9.3 Kernel
A valid uImage-pfla02 must be available on the TFTP server, <TFTP_DIRECTORY>/phyFLEX-iMX6/images.
NAND Flash
update -t kernel -d nand -m tftp -f phyFLEX-iMX6/images/uImage-pfla02
NOR Flash
update -t kernel -d nor -m tftp -f phyFLEX-iMX6/images/uImage-pfla02
9.4 Root Filesystem
A valid root-pfla02.ubi must be available on the TFTP server, <TFTP_DIRECTORY>/phyFLEX-iMX6/images.
NAND Flash
update -t rootfs -d nand -m tftp -f phyFLEX-iMX6/images/root-pfla02.ubi
NOR Flash
update -t rootfs -d nor -m tftp -f phyFLEX-iMX6/images/root-pfla02.ubi
Note: The root filesystem available on the FTP will be too large to flash to NOR. However, if a more minimal filesystem was built, it can be flashed.