...
Hide If special @anonymous Status colour Yellow title MOVED
This Quickstart provides you with the tools and know-how to install and work with the Linux Board Support Package (BSP) for the phyBOARD-Zeta. This Quickstart shows you how to do everything from installing the appropriate tools and source, to building custom kernels, to deploying the OS, to exercising the software and hardware. Additionally, gain access to the SOM and baseboard schematics for the phyBOARD-Zeta by registering at the following: http://phytec.com/support/registration/.
...
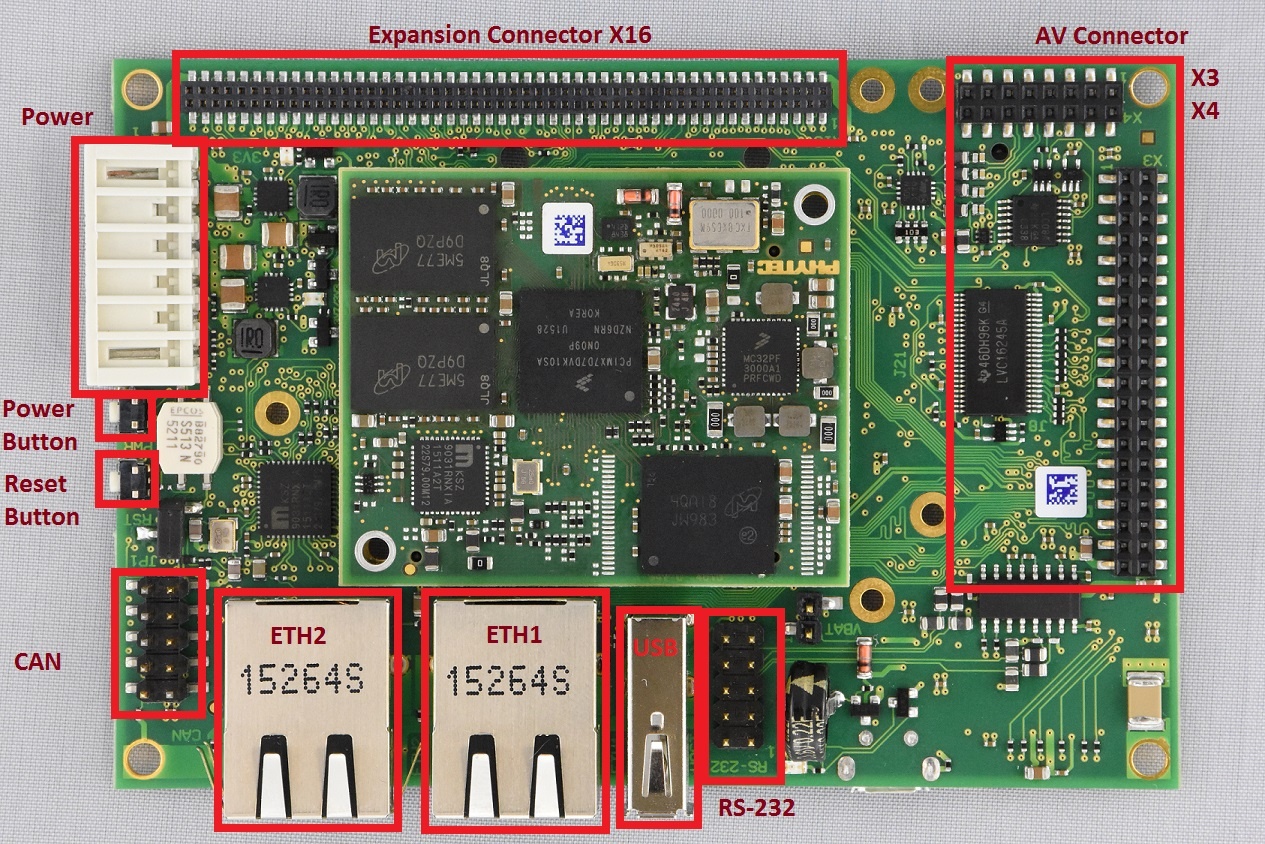
Use the following as a reference for the connector interfaces on the phyBOARD-i.MX7 that will be used in this Quickstart.
Expansion Boards
Use the following images as a reference when connecting any compatible PHYTEC expansion boards.
...
| Note | ||
|---|---|---|
| ||
Not seeing output on the console?
|
| Anchor | ||||
|---|---|---|---|---|
|
...
| Note |
|---|
The above is the recommended package installation for development on a Ubuntu 14.04 LTS Linux distribution. For a breakdown of the packages as well as a list of packages required for other Linux distributions, see the "Required Packages for the Host Development System" section in the Yocto Project Reference Manual: http://www.yoctoproject.org/docs/2.0.1/ref-manual/ref-manual.html#required-packages-for-the-host-development-system |
Verify that the preferred shell for your Host PC is ''bash'' and not ''dash'':
...
Device trees for PHYTEC products consist of a board DTS file, a SOM dtsi and a carrier board dtsi. The SOM dtsi includes the processor dtsi and contains definitions for all devices that are located on the SOM, such as eMMC flash. Peripherals whose signals are routed through the SOM but whose hardware is located on the carrier board are defined in the carrier board dtsi, such as SD/MMC. All of the peripherals in these files are enabled or disabled in imx7d-phyboard-zeta.dts.
| Info | ||||
|---|---|---|---|---|
| ||||
To disable a peripheral such as EEPROM, change the status of the i2c_eeprom in arch/arm/boot/dts/imx7d-phyboard-zeta.dts from "okay" to "disabled":
|
...
| Warning |
|---|
Due to the UUIDs of the partitions in the sdcard image, it is recommended that you manually format the SD card if you plan on using it after flashing the image to eMMC, otherwise mmcblk0p1 and mmcblk1p1 as well as mmcblk0p2 and mmcblk1p2 will have the same UUID. |
Due to the size of the image, a new partition is required on the SD card to hold it. To create an additional partition that extends to the rest of the SD card, execute the following from your host machine:
Code Block sudo fdisk /dev/sd<X> p print partition table. *Note end of partition /dev/sd<x>2* n new partition p primary 3 partition number <start> enter value after end of partition 2 (from partition table). This is the first sector of partition 3 <enter> Use default value for last sector t Change partition system id 3 Partition number c FAT32 w write table to disk and exit sudo mkfs.vfat -n "data" /dev/sd<X>3
Copy the sdcard image to the new "data" partition:
Code Block cp fsl-image-gui-imx7d-phyboard-zeta.sdcard /media/data/; sync
...
- Configure the boot switch to boot from SD Card as described in Selecting Boot Modes. Power on the board and stop in U-Boot.
Flash fsl-image-gui-imx7d-phyboard-zeta.sdcard from the SD card to eMMC. This will partition the card and copy u-boot, zImage, dtb, and root filesystem to eMMC.
Code Block => fatload mmc 0:3 ${loadaddr} fsl-image-gui-imx7d-phyboard-zeta.sdcard reading fsl-image-gui-imx7d-phyboard-zeta.sdcard 935329792 bytes read in 41164 ms (21.7 MiB/s) => mmc dev 1 switch to partitions #0, OK mmc1(part 0) is current device => mmc write ${loadaddr} 0x0 <number of blocks to write. In this case 0x1BF000> MMC write: dev # 1, block # 0, count 1830912 ... 1830912 blocks written: OKReset the board. Stop in U-Boot again and check that the partition table for eMMC is as expected.
Code Block => reset ... => mmc dev 1 switch to partitions #0, OK mmc1(part 0) is current device => mmc part Partition Map for MMC device 1 -- Partition Type: DOS Part Start Sector Num Sectors UUID Type 1 8192 16384 ef3963c1-01 0c 2 24576 1794048 ef3963c1-02 83
...