Phytec中国的wiki
support@phytec.cn![]()
热线:0755-61802110-803
编译环境准备
WEC7的文档请按照
http://www.phytec.de/produkt/system-on-modules/phycore-am335x-download/
中的

来操作。但其中的有些链接已失效,请联系 support@phytec.cn 下载。
其中需要
软件名 | 信息 |
|---|---|
| phyCORE-AM335x_SourceBSP_PD13.2.0.zip | PD13.2.0 BSP包 |
| phyCORE-AM335x_SourceBSP_PD13.3.0.zip | PD13.3.0 升级包,只包括升级的内容 |
| VS2008 | Visual Studio 2008 |
| VS2008SP1 | Visual Studio 2008 SP1 |
| WindowsEmbeddedCompact7 | WEC7 |
| VisualStudioDeviceWindowsEmbeddedCompact7 | error C2039: 'lstrlenW' : is not a member of 'ATL' error C2039: "lstrlenW": 不是"ATL"的成成员 修复 Windows Embedded Compact 7 ATL Update for Visual Studio 2008 SP1 |
制作SD卡启动盘并配置开发板为SD卡启动
烧写镜像的方法是用一张sd卡做为启动盘,然后将系统写入nand。
需要使用下面的工具来格式化SD卡
HP USB Disk Storage Format Tool v2.0.6 Portable.exe
如果遇到提示写保护,可以尝试用 我的电脑 - 右键,管理 - 磁盘管理 - 删除sd卡上的分区,然后再试。
然后再将以下文件复制到sd卡,可以自己编译(默认输出路径 C:\WINCE700\OSDesigns\PhytecAM335x_RDK\PhytecAM335x_RDK\RelDir\PhyCORE_AM335x_BSP_ARMV7_Release),也可以用我们ftp上的。
| 文件 | 用途 | 下载地址 |
|---|---|---|
| MLO | sd启动第一级 | D9PWF SD |
| EBOOTSD.nb0 | sd启动用,第二级 | D9PWF SD |
| NK.bin | 系统 | image 请根据内存大小选择 |
| EBOOTND.bin | nand启动用 | D9PWF NAND |
| XLDRNAND.bin | nand启动用 | D9PWF NAND |
对于我们的开发板自带的核心板,请使用D9PWF版本的bootloader
然后设定板子为SD卡启动,在我们的开发板为
注意am335x需要重新上电才会采样启动配置,reset包括硬件reset都不能修改启动配置,在修改配置后必须重新上电
| 启动方式 | q启动配置截图 | s5实拍图 |
|---|---|---|
| SD卡启动 |
|
|
| NAND启动 |
|
|


从SD卡启动系统
在配置开发板从SD卡启动,并复制好文件后,需要在eboot中选择从SD卡加载nk.bin文件,如下:
Hit space to enter configuration menu [446] 3...
Hit space to enter configuration menu [1446] 2...

--------------------------------------------------------------------------------
 Main Menu
--------------------------------------------------------------------------------
 [1] Show Current Settings
 [2] Select Boot Device
 [3] Select KITL (Debug) Device
 [4] Network Settings
 [5] SDCard Settings
 [6] Set Device ID
 [7] Save Settings
 [8] Flash Management
 [9] Enable/Disable OAL Retail Messages
 [a] Select Display Resolution
 [b] Select OPP Mode
 [c] Aux Functions
 [0] Exit and Continue

 Selection: 2

--------------------------------------------------------------------------------
 Select Boot Device
--------------------------------------------------------------------------------
 [1] Internal EMAC
 [2] NK from SDCard FILE
 [3] NK from NAND
 [0] Exit and Continue

 Selection (actual NK from NAND): 2
 Boot device set to NK from SDCard FILE

--------------------------------------------------------------------------------
 Main Menu
--------------------------------------------------------------------------------
 [1] Show Current Settings
 [2] Select Boot Device
 [3] Select KITL (Debug) Device
 [4] Network Settings
 [5] SDCard Settings
 [6] Set Device ID
 [7] Save Settings
 [8] Flash Management
 [9] Enable/Disable OAL Retail Messages
 [a] Select Display Resolution
 [b] Select OPP Mode
 [c] Aux Functions
 [0] Exit and Continue

 Selection: 7
 Do you want save current settings [-/y]? y
 Current settings has been saved

--------------------------------------------------------------------------------
 Main Menu
--------------------------------------------------------------------------------
 [1] Show Current Settings
 [2] Select Boot Device
 [3] Select KITL (Debug) Device
 [4] Network Settings
 [5] SDCard Settings
 [6] Set Device ID
 [7] Save Settings
 [8] Flash Management
 [9] Enable/Disable OAL Retail Messages
 [a] Select Display Resolution
 [b] Select OPP Mode
 [c] Aux Functions
 [0] Exit and Continue

 Selection: 0
OEMPreDownload: Filename nk.bin

BL_IMAGE_TYPE_BIN
...
烧写系统到NAND
在设为从sd卡启动后,插入sd卡,启动后在提示
Hit space to enter configuration menu
时按空格键进去eboot菜单
- 烧写XLDRNAND.bin文件
- [8] Flash Management ->[3] Erase flash -> y -> [4] Erase block range -> First Block Number: 0 -> Last Block Number: 20 -> [8] Enable flashing NK.bin -> y -> [9] Set ECC mode -> 4(BCH 8bit ELM-X) -> [0] Exit and Continue
- [2] Select Boot Device -> [2] NK from SDCard FILE
- [5] SDCard Settings -> [2] Enter Filename -> XLDRNAND.bin -> [0] Exit and Continue
- [0] Exit and Continue
- 提示
XLDR image written
INFO: XLDR/EBOOT/IPL downloaded, spin forever
- 表示成功烧写XLDRNAND.bin。按reset。
- 烧写EBOOTND.bin文件
- [8] Flash Management ->[8] Enable flashing NK.bin -> y -> [9] Set ECC mode -> 3(BCH 8bit ELM) -> [0] Exit and Continue
- [2] Select Boot Device -> [2] NK from SDCard FILE
- [5] SDCard Settings -> [2] Enter Filename -> EBOOTND.bin -> [0] Exit and Continue
- [0] Exit and Continue
- 提示
EBOOT image written
ROMHDR at Address 8FE00044h
INFO: XLDR/EBOOT/IPL downloaded, spin forever
- 表示成功烧写EBOOTND.bin,此时关闭电源设定为nand启动。
- 开机后,会有初始化过程,初始化完成后,进入eboot菜单,关闭电源。
FindFreeSector: FreeSector is: 0xc400 after processing part 0x20.
CreatePartition: Num sectors set to 0x33500 to allow for compaction blocks.
CreatePartition: Start = 0xc400, Num = 0x33500.
WriteMBR: MBR block = 0x12.
Flash format complete!

>>> Forcing cold boot (non-persistent registry and other data will be wiped) <<<
5b6a1ba8 5d8b -> a8 1b 6a 5b 8b 5d
5b6a1ba8 5f8b -> a8 1b 6a 5b 8b 5f
Hit space to enter configuration menu [28301] 3...
Hit space to enter configuration menu [29301] 2...
- 设为从sd卡启动,上电
- 烧写NK.bin文件
- [8] Flash Management ->[8] Enable flashing NK.bin -> y -> [0] Exit and Continue
- [2] Select Boot Device -> [2] NK from SDCard FILE
- [5] SDCard Settings -> [2] Enter Filename -> NK.bin (如果大写不行可换为nk.bin)-> [0] Exit and Continue
- [0] Exit and Continue
- 提示
+OEMMultiBinNotify(0x8feb2560 -> 1)
Download file information:
-----------------------------------------------------------
[0]: Address=0x80002000  Length=0x0618233c  Save=0x80002000
-----------------------------------------------------------
Download file type: 1
.........................................................................................................................................................................................................................................................................................................................rom_offset=0x0.
..ImageStart = 0x80002000, ImageLength = 0x618233c, LaunchAddr = 0x8000b620

Completed file(s):
-------------------------------------------------------------------------------
[0]: Address=0x80002000  Length=0x618233c  Name="" Target=RAM
ROMHDR at Address 80002044h

Writing NK image to OS partition

...


NK Image Loaded
Launch Windows CE image by jumping to 0x80002000...

Windows CE Kernel for ARM (Thumb Enabled)
CPU CP15 Control Register = 0xc5387f
CPU CP15 Auxiliary Control Register = 0x42
+OALTimerInit(1, 24000, 200)
--- High Performance Frequecy is 24 MHz---
- NK.bin烧写成功。
- 保存启动参数
- 关闭电源,设为nand启动,开机,进eboot菜单
- [2] Select Boot Device -> [2] NK from NAND
- [9] Select Display Resolution -> [5] 7in EMERGING ETM07 (800x480@60Hz)
- [7] Save Settings
- [0] Exit and Continue
- 提示
NK Image Loaded
Launch Windows CE image by jumping to 0x80002000...

Windows CE Kernel for ARM (Thumb Enabled)
CPU CP15 Control Register = 0xc5387f
CPU CP15 Auxiliary Control Register = 0x42
+OALTimerInit(1, 24000, 200)
--- High Performance Frequecy is 24 MHz---
- 同时屏幕出现校准画面,点击完成后,进入win ce系统。
触摸屏没有反映
触屏没有反应可能是由于设置的屏幕参数不正确导致的,需要在eboot中选择
- Select Display Resolution -> [5] 7in EMERGING ETM07 (800x480@60Hz)
- [7] Save Settings -> y -> [0] Exit and Continue
选项,然后重启
应用软件编译问题
以下我们以BSP带的helloworld为例,在下面操作中,软件都为默认安装位置,如有修改请自行替换。
打开 C:\PHYTEC\PCM051_phyCORE-AM335x\Demos\Demo 中的 HelloWorld.sln。
打开Solution Explorer(解决方案资源管理器)->右键点HelloWorld → 属性→Configuration Properties->General(常规)->C/C++->General→Additional Incllude Directories(附加包含目录)

增加以上路径。
如果没有 C:\Program Files (x86)\Microsoft Visual Studio 9.0\VC\ce7\ 这个文件夹,则需要安装上面提到的 Windows Embedded Compact 7 ATL Update for Visual Studio 2008 SP1
这样就可以编译通过了。
系统镜像编译问题
编译时的设置截图


调试方法
开启debug输出
--------------------------------------------------------------------------------
 Main Menu
--------------------------------------------------------------------------------
 [1] Show Current Settings
 [2] Select Boot Device
 [3] Select KITL (Debug) Device
 [4] Network Settings
 [5] SDCard Settings
 [6] Set Device ID
 [7] Save Settings
 [8] Flash Management
 [9] Enable/Disable OAL Retail Messages
 [a] Select Display Resolution
 [b] Select OPP Mode
 [c] Aux Functions
 [0] Exit and Continue
选9 就可以有debug输出
简化烧写过程的补丁
phyCORE-AM335x_WEC7_autoProgramming_Feature.zip
解压缩后,覆盖对应文件夹的源代码文件,再次编译,即可。
然后将生成的文件复制到SD卡,从SD启动。
按空格键进入EBOOT的主菜单:
Hit space to enter configuration menu [28877] 2...

--------------------------------------------------------------------------------
 Main Menu
--------------------------------------------------------------------------------
 [1] Show Current Settings
 [2] Select Boot Device
 [3] Select KITL (Debug) Device
 [4] Network Settings
 [5] SDCard Settings
 [6] Set Device ID
 [7] Save Settings
 [8] Flash Management
 [9] Enable/Disable OAL Retail Messages
 [a] Select Display Resolution
 [b] Select OPP Mode
 [c] Aux Functions
 [p] Auto Programming
 [0] Exit and Continue

 Selection: 8
选择8, 进入Flash Management菜单
--------------------------------------------------------------------------------
 Flash Management
--------------------------------------------------------------------------------
 [1] Show flash geometry
 [2] Dump flash sector
 [3] Erase flash
 [4] Erase block range
 [5] Reserve block range
 [6] Set bad block
 [7] Format flash
 [8] Enable flashing NK.bin
 [9] Set ECC mode
 [a] Write NAND Block
 [b] Read NAND Block
 [0] Exit and Continue

 Selection: 7
 Do you want to format unreserved blocks [-/y]? y
选择7, 格式化flash, 格式化log如下
格式化完成后选择0进入主菜单,然后选择2进去启动设备选择菜单, 选择2从sdcard启动, 然后退出进入主菜单
--------------------------------------------------------------------------------
 Flash Management
--------------------------------------------------------------------------------
 [1] Show flash geometry
 [2] Dump flash sector
 [3] Erase flash
 [4] Erase block range
 [5] Reserve block range
 [6] Set bad block
 [7] Format flash
 [8] Enable flashing NK.bin
 [9] Set ECC mode
 [a] Write NAND Block
 [b] Read NAND Block
 [0] Exit and Continue

 Selection: 0

--------------------------------------------------------------------------------
 Main Menu
--------------------------------------------------------------------------------
 [1] Show Current Settings
 [2] Select Boot Device
 [3] Select KITL (Debug) Device
 [4] Network Settings
 [5] SDCard Settings
 [6] Set Device ID
 [7] Save Settings
 [8] Flash Management
 [9] Enable/Disable OAL Retail Messages
 [a] Select Display Resolution
 [b] Select OPP Mode
 [c] Aux Functions
 [p] Auto Programming
 [0] Exit and Continue

 Selection: 2

--------------------------------------------------------------------------------
 Select Boot Device
--------------------------------------------------------------------------------
 [1] Internal EMAC
 [2] NK from SDCard FILE
 [3] NK from NAND
 [0] Exit and Continue

 Selection (actual NK from SDCard FILE ): 2
 Boot device set to NK from SDCard FILE
接下来执行自动烧写镜像步骤:
--------------------------------------------------------------------------------
 Main Menu
--------------------------------------------------------------------------------
 [1] Show Current Settings
 [2] Select Boot Device
 [3] Select KITL (Debug) Device
 [4] Network Settings
 [5] SDCard Settings
 [6] Set Device ID
 [7] Save Settings
 [8] Flash Management
 [9] Enable/Disable OAL Retail Messages
 [a] Select Display Resolution
 [b] Select OPP Mode
 [c] Aux Functions
 [p] Auto Programming
 [0] Exit and Continue

 Selection: p
这里新增加了选项 Auto Programming,选择p
--------------------------------------------------------------------------------
 Auto Programming
--------------------------------------------------------------------------------
 [1] Enable/Disable auto programming
 [2] Enable/Disable bootlogo auto programming
 [0] Exit and Continue

 Selection: 1

 Enable auto programming (y/-):y
选择1,然后y确认,然后选择0退出这一级菜单
Hit space to enter configuration menu [1466] 2...

--------------------------------------------------------------------------------
 Main Menu
--------------------------------------------------------------------------------
 [1] Show Current Settings
 [2] Select Boot Device
 [3] Select KITL (Debug) Device
 [4] Network Settings
 [5] SDCard Settings
 [6] Set Device ID
 [7] Save Settings
 [8] Flash Management
 [9] Enable/Disable OAL Retail Messages
 [a] Select Display Resolution
 [b] Select OPP Mode
 [c] Aux Functions
 [p] Auto Programming
 [0] Exit and Continue

 Selection: 7 and then 0
选择7,保存设置,然后选0退出。
此时按0退出主餐单后,就开始烧写,有时烧写会不成功,请注意要等到
INFO: Auto programming completed! Spin forever! Please configure boot pins to boot from flash medium!
才可以认为是烧写完成。
为系统增加中文支持
根据
https://blog.csdn.net/EmSoftEn/article/details/43964311
需要增加


此时就可以显示中文的应用程序。
如果要编译中文的系统
根据
https://blog.csdn.net/nanjianhui/article/details/4394397
需修改

重新编译即可。
编译结果的路径
set CPPATH=C:\WINCE700\OSDesigns\PhytecAM335x_RDK\PhytecAM335x_RDK\RelDir\PhyCORE_AM335x_BSP_ARMV7_Release
set TAPATH=C:\Users\Bob\Desktop\wec7image
copy /B /V /Y %CPPATH%\EBOOTND.bin %TAPATH%
copy /B /V /Y %CPPATH%\EBOOTND.nb0 %TAPATH%
copy /B /V /Y %CPPATH%\EBOOTSD.nb0 %TAPATH%
copy /B /V /Y %CPPATH%\MLO %TAPATH%
copy /B /V /Y %CPPATH%\NK.bin %TAPATH%
copy /B /V /Y %CPPATH%\XLDRNAND.bin %TAPATH%
pause
新的LCD添加方法(未测试)
1) menu.c -> add a new LCD in dispResMenu
2) bsp_lcdc.h -> change LCDC_PANEL_MAX_ENTRY from 6 to 7
-> add a new LCD in BSP_LCDC_RES
3) lcd_vga.c -> add a new LCD in g_rgLCDPanel according to the LCD spec
4) main.c -> change LCD_017_800x480 to name of the new LCD
And need not to change LcdPdd_LCD_Initialize() in lcdc.c
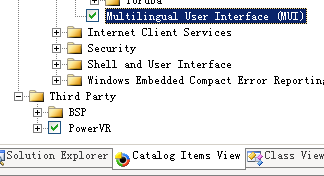
增加SD卡支持
在Catalog Items中选择以下几个(加粗,加*)
- Core OS
- Windows Embedded Compact
- Device Drivers
- SD
- *SD Bus Driver
- SD Clients
- *SD Memory
- SD Host
- *SD Standard Host Controller
- SD
- Device Drivers
- Windows Embedded Compact
- Third Party
- BSP
- PHYTEC_AM335x_BSP:ARMv7
- Drivers
- Storage Devices
- *SD Host Controller
- Storage Devices
- Drivers
- PHYTEC_AM335x_BSP:ARMv7
- BSP
增加播放器支持
在Catalog Items中选择以下几个(加粗,加*)
- Core OS
- Windows Embedded Compact
- Device Drivers
- Bus Drivers
- *I2C Bus
- Bus Drivers
- Graphics and Multimedia Technologies
- Audio
- *Audio Compression Manager
- *MSFilter Codec
- *Audio Compression Manager
- Media
- Windows Media Player
- Windows Media Player Applications
- *Windows Music Player
- Windows Media Player Applications
- *WMA and MP3 Local Playback
- Windows Media Player
- Audio
- Shell and User Interface
- Shell
- Screen configuration (Choose 1)
- *800x480 Landscape
- Screen configuration (Choose 1)
- Shell
- Device Drivers
- Windows Embedded Compact
- 修改platform/AM335xPhytec/SRC/DRIVERS/AUDIO/CODEC/WM8974/wm8974.reg 中的 [HKEY_CURRENT_USER\ControlPanel\Volume] 中的 "Mute" 为 dword:1
即可播放wav文件
编译后的镜像起不来
Completed file(s):
-------------------------------------------------------------------------------
[0]: Address=0x80002000  Length=0x4bb34f4  Name="" Target=RAM
ROMHDR at Address 80002044h
Launch Windows CE image by jumping to 0x8000b4c0...

Windows CE Kernel for ARM (Thumb Enabled)
CPU CP15 Control Register = 0xc5387f
CPU CP15 Auxiliary Control Register = 0x42
+OALTimerInit(1, 24000, 200)
--- High Performance Frequecy is 24 MHz---
DeviceId................. AM335X-
pArgs->flags............. 0x29
pArgs->devLoc.IfcType.... 0
pArgs->devLoc.LogicalLoc. 0x4A100000
pArgs->devLoc.PhysicalLoc 0x0
pArgs->devLoc.Pin........ 0
pArgs->ip4address........ 1
pDevice->Name............  s
pDevice->ifcType......... 0
pDevice->id.............. 0x4A100000
pDevice->resource........ 0
pDevice->type............ 2
pDevice->pDriver......... 0x84BCF000
g_kitlLock = 0x84C0BD90
+OEMKitlInit(0x84c0cf00)
+Cpsw3gInit(0x4A100000, 0x00000001, 0x84bcf528) v0.3
Auto negotitation failed
Cpsw3gInit, LINK down on port:1.
KITL: *** Device Name AM335X-44438 ***
WARN: KITL can't obtain IRQ for KITL device
WARN: KITL will run in polling mode
VBridge:: built on [Mar 10 2018] time [01:18:25]
VBridgeInit()...TX = [16384] bytes -- Rx = [16384] bytes
Tx buffer [0x84C03D60] to [0x84C07D60].
Rx buffer [0x84C07D80] to [0x84C0BD80].
VBridge:: NK add MAC: [68-C9-B-1F-AD-96]
-OEMKitlInit(rc = 1)
Connecting to Desktop
ERROR: Cpsw3gSendFrame: Timed out waiting for the transfer to complete.
!Driver Send failure, retry 0

No free TX BD found !
!Driver Send failure, retry 1
需要修改之前的KITL配置
编译不通过
报错于EMIF,等硬件驱动相关。
请检查Catalog Items View中的
Third Party - BSP - PHYTEC_AM335x_BSP:ARMV7 - SOM - DDR - DDR3 1x256M16 (D9PWF)
是否已选择。
切换RTC为PMIC
删除oalexe source中的*_phycore_oalrtc.lib文件,
更换为 tps6591x_oal_rtc.lib.
去掉OAL/OALLIB/init.c中OAL3XX_RTCInit 的注释。
增加一个可写的分区
修改Platform\AM335xPhytec\SRC\BOOTLOADER\EBOOT\flash.c文件
@@ -747,5 +744,24 @@ BOOL BLConfigureFlashPartitions(BOOL bForceEnable)
        hPartition = BP_OpenPartition((DWORD)NEXT_FREE_LOC,
+											  (DWORD)500,
+											  PART_DOS32,
+											  TRUE,
+											  PART_CREATE_NEW);
+
+				if (hPartition == INVALID_HANDLE_VALUE){
+					OALLog(L"Error1111 creating file partition!!\r\n");
+					goto cleanUp;
+				}
+
+				hPartition = BP_OpenPartition((DWORD)NEXT_FREE_LOC,
											  (DWORD)USE_REMAINING_SPACE,
											  PART_DOS32,
											  FALSE,
											  PART_CREATE_NEW);
在烧写/使用新的镜像后,需要用eboot中的格式化将flash重新格式化。
屏蔽explorer.exe开机启动
修改public\shell\oak\files\shell.reg中的
 "Launch50"="explorer.exe"
 "Depend50"=hex:14,00,1e,00
编译指令与修改项目
| 修改的项目 | 执行指令 |
|---|---|
| catalog item |
|
| registry change |
|
IMG enviroment change like IMGNOKITL | build →Make run-time image |
| subproject code change(in public?) | build→ Adv → "build current BSP and Subprojects" |
Overview
Content Tools
Activity
Tasks
support@phytec.cn![]()
热线:0755-61802110-803