| Targeted Hardware | phyBOARD-imx6-mira |
| Targeted Software | BSP Yocto Yogurt i.MX6 PD16.1.0 Release Notes |
| Date |
|
Customizing a BSP to support a specific application is a common task in designing systems with PHYTEC SoMs. Describing custom hardware, adding packages to your BSP, and adding custom OS services to your BSP are just a few simple examples of customizing a BSP. Yocto enables customization through it's meta-layer scheme. The BSP is described within these layers. Everything from where Yocto can find the source to how it builds the source and where it is deployed. Customizing a BSP is as simple as adding your own meta-layer. You can find pre-made layers here or you can find instructions on creating your own custom layer below. More specifically, this Application Note will guide you through customizing the device tree for the phyCORE-i.MX6.
As a reference point, this how-to will begin just before the Quickstart (also called BSP manual) instructs you to execute the 'bitbake <image_name>' command. However, these instructions are relevant for both pre and post build environments.
Start by creating a development directory within $YOCTO_DIR
mkdir $YOCTO_DIR/development |
With your environment variables sourced according to instructions in the respective Quickstart, create your meta layer skeleton and move it to the development directory with the following commands:
cd $YOCTO_DIR/build yocto-layer create custom mv meta-custom/ ../development/ |
The 'yocto-layer create' command will create a meta layer with the name specified after this command. It will automatically prepend the "meta-" string. meta-custom is used in this example but can be changed to suit your application. |
Congratulations! You have just created a meta-layer. Now is a good time to add your work to a git repository:
cd $YOCTO_DIR/development/meta-custom/ git init && git add . && git commit -s |
Each meta layer has its own configuration file, called "layer.conf".Configuring your layer will let Yocto know how it should deal with what's inside your layer. In this example, we will be defining custom hardware within meta-custom.
meta-phytec contains machine configuration files that describe standard hardware. The machine configuration is where you define the device tree binary file, bootloader image, etc. You'll need to let Yocto know to use your machine configuration and not the machine configuration from meta-phytec. This is achieved by setting the BBFILE_PRIORITY_* variable in meta-custom to something greater than that of the meta-phytec BBFILE_PRIORITY_* priority. Use the command below to obtain the meta-phytec layer priority and use your favorite text editor to modify your layer's layer.conf file to reflect a higher priority than meta-phytec's.
cat $YOCTO_DIR/sources/meta-phytec/conf/layer.conf | grep PRIORITY |

It is not required, although for this example we will be defining a custom machine configuration. This is done in your meta layers 'conf/machine' directory.
Create the machine directory and copy the standard machine configuration that closest describes your hardware into the machine directory
Standard PHYTEC machine configurations can be found in '$YOCTO_DIR/sources/meta-phytec/conf/machine' |
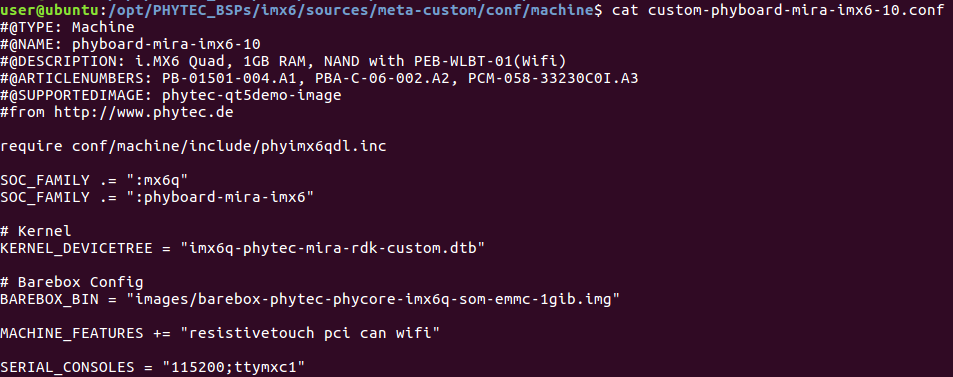
mkdir $YOCTO_DIR/development/conf/machine cp $YOCTO_DIR/sources/meta-phytec/conf/machine/<standard_machine_conf_name>.conf $YOCTO_DIR/development/meta-custom/conf/machine/<custom_machine_conf_name>.conf |
The kernel and bootloader Yocto recipes specify target machines that they are compatible with. Because we are creating a custom machine configuration, we need to add our machine to the kernel and u-boot recipes. This can be done by simply appending the existing kernel and bootloader recipes (*.bb files).
First, you'll need to create a directory structure in your meta layer that matches the directory structure of the original recipe.
Kernel recipes are located in the following directory: $YOCTO_DIR/sources/meta-phytec/recipes-kernel/linux/ |
mkdir -p $YOCTO_DIR/development/meta-custom/recipes-kernel/linux/ |
The recipe append files (*.bbappend) also need to be named similarly (with the exception of the .bbappend file extenstion). There can be multiple kernel recipes within the kernel recipes directory. There are a few methods to find which recipe Yocto is using to build the BSP, here is one method:
cd $YOCTO_DIR/build bitbake-layers show-recipes | grep linux -A 10 | grep meta-phytec -B 5 |
The command above will list the kernel recipes within the meta-phytec layer. There should be only one recipe that is not "(skipped)". In this example, the recipe used by Yocto would be named "linux-mainline_4.1.36-phy3.bb" (general format is: <name>_<version>.bb).

Now that we know the name of the original recipe we can create our *.bbappend file.
cd $YOCTO_DIR/development/meta-custom/recipes-kernel/linux/ touch linux-mainline_4.1.36-phy3.bbappend |
Use your favorite editor to add the following line to your *.bbappend file. This will add machine compatibililty, particularly the custom machine that was created earlier in the how-to, to the kernel recipe:
COMPATIBLE_MACHINE .= "|<custom_machine_conf_name>" |
Do not include the file extension in the machine name. |
Similar to the kernel recipe, you will need to add your custom machine to the bootloaders list of compatible machines. The steps are the same as the kernel.
Create a directory structure in your meta layer that matches the directory structure of the original recipe.
Bootloader recipes are located in the following directory: $YOCTO_DIR/sources/meta-phytec/recipes-bsp/barebox Your SoM BSP may support a different bootloader (such as u-boot). Check your BSPs release notes for details |
mkdir -p $YOCTO_DIR/development/meta-custom/recipes-bsp/barebox/ |
The recipe append files (*.bbappend) also need to be named similarly (with the exception of the .bbappend file extenstion). There can be multiple barebox recipes within the kernel recipes directory. There are a few methods to find which recipe Yocto is using to build the BSP, here is one method:
cd $YOCTO_DIR/build bitbake-layers show-recipes | grep barebox -A 10 | grep meta-phytec -B 5 |
The command above will list the barebox recipes within the meta-phytec layer. There should be only one recipe that is not "(skipped)". In this example, the recipe used by Yocto would be named "barebox_2016.11.0-phy4.bb" (general format is: <name>_<version>.bb).

Now that we know the name of the original recipe we can create our *.bbappend file.
cd $YOCTO_DIR/development/meta-custom/recipes-bsp/barebox/ touch barebox_2016.11.0-phy4.bbappend |
Use your favorite editor to add the following line to your *.bbappend file. This will add machine compatibililty, particularly the custom machine that was created earlier in the how-to, to the barebox recipe:
COMPATIBLE_MACHINE .= "|<custom_machine_conf_name>" |
Do not include the file extension in the machine name. |
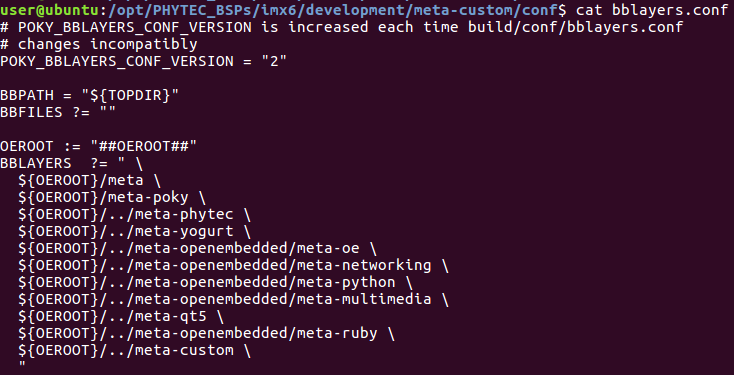
Copy the bblayers.conf.sample in meta-phytec to your meta layer's 'conf' directory and add your layer to the list of layers. Add this file to your meta-custom git repo.
cp $YOCTO_DIR/sources/meta-phytec/conf/bblayers.conf.sample $YOCTO_DIR/development/meta-custom/conf |

Copy the local.conf.sample file in meta-phytec to your meta layer's 'conf' directory and specify your custom machine name in the local.conf.sample file. Add this file to your meta-custom git repo.
cp $YOCTO_DIR/sources/meta-phytec/conf/local.conf.sample $YOCTO_DIR/development/meta-custom/conf |
Now that you have configured your meta layer, you can start adding customizations. Any customizations to the standard BSP should be implemented in your custom meta layer. For this example we will create a custom device tree.
Specific instructions on customizing the device tree can be found here.
Once you have the kernel patch, you can place it into the $YOCTO_DIR/development/meta-custom/recipes-kernel/linux directory. You will need to add the following two lines to your kernel append recipe in your layer:
FILESEXTRAPATHS_prepend := "${THISDIR}/:"
SRC_URI += "file://custom_device_tree.patch" |
The first line tells Yocto to look in the the directory that the file exists for files that need to be processed by Yocto (i.e. patch files). The second line identifies the file to be processed by Yocto. In this case, Yocto will identify this as a patch file and apply the patch to the source before building.
Be sure to specify your custom device tree binary file in the custom machine configuration that was created earlier:

Copy the manifest file from your $YOCTO_DIR/.repo/ directory to $YOCTO_DIR/development/manifest/
Commit the standard manifest to git.
Modify your manifest to add source repositories for your custom meta-layer.

Commit and push your changes to a remote repository.
Use the 'repo' command to initialize a repo in a clean directory and 'repo sync' to download the contents of the manifest.
repo init -u <URL to your remote repo containing custom manifest file> -b <branch that contains your custom manifest> -m <your custom manifest's file name>.xml repo sync |
Set up your environment and source environment variables with the following command:
TEMPLATECONF=$YOCTO_DIR/sources/meta-custom/conf MACHINE=custom-phyboard-mira-imx6-10 source sources/poky/oe-init-build-env build |