Phytec中国的wiki
support@phytec.cn![]()
热线:0755-61802110-803
蓝牙
Yocto工程修改
新建一个meta-layer,将下面的代码合入。
可以放到local.conf或者是machine.conf当中。
IMAGE_INSTALL_append = " \
    glibc-gconv-utf-16 \
"

meta-test/recipes-images/packagegroups/packagegroup-bluetooth.bbappend
RDEPENDS_${PN}_append = " \
    bluez5-noinst-tools \
"
配对
可以使用hciconfig hci0 name去设置设备蓝牙名称。
root@phyboard-pollux-imx8mp-3:/# hciconfig hci0 name min_8mp
root@phyboard-pollux-imx8mp-3:/# hciconfig hci0 name
hci0:	Type: Primary  Bus: UART
	BD Address: 00:25:CA:3F:B0:2A  ACL MTU: 1021:8  SCO MTU: 64:1
	Name: 'min_8mp'
使用bluetoothctl工具进行扫描和配对,配对时会命令行提示是否进行配对,需要输入yes。如下检测到MIN_PC(一台本地电脑),MIN_PC设备上也需要点击同意配对,并配对成功。
root@phyboard-pollux-imx8mp-3:/# bluetoothctl
Agent registered
[CHG] Controller 00:25:CA:3F:B0:2A Pairable: yes
[bluetooth]# scan on
Discovery started
[NEW] Device 78:AF:08:BE:E8:98 MIN_PC                       .
[bluetooth]# devices
Device 5F:7C:48:0A:8D:C5 5F-7C-48-0A-8D-C5
Device 59:40:F2:34:B7:26 59-40-F2-34-B7-26
Device 44:53:06:E1:0C:46 5fc36c
Device 49:B4:52:C3:47:3A 49-B4-52-C3-47-3A
Device 78:AF:08:BE:E8:98 MIN_PC
[CHG] Device 78:AF:08:BE:E8:98 RSSI: -28
[bluetooth]# pair 78:AF:08:BE:E8:98
Attempting to pair with 78:AF:08:BE:E8:98
[CHG] Device 78:AF:08:BE:E8:98 Connected: yes
Request confirmation
[agent] Confirm passkey 705274 (yes/no): yes
[CHG] Device 78:AF:08:BE:E8:98 Modalias: bluetooth:v0006p0001d0A00
[CHG] Device 78:AF:08:BE:E8:98 UUIDs: 00001000-0000-1000-8000-00805f9b34fb
[CHG] Device 78:AF:08:BE:E8:98 UUIDs: 0000110a-0000-1000-8000-00805f9b34fb
[CHG] Device 78:AF:08:BE:E8:98 UUIDs: 0000110b-0000-1000-8000-00805f9b34fb
[CHG] Device 78:AF:08:BE:E8:98 UUIDs: 0000110c-0000-1000-8000-00805f9b34fb
[CHG] Device 78:AF:08:BE:E8:98 UUIDs: 0000110e-0000-1000-8000-00805f9b34fb
[CHG] Device 78:AF:08:BE:E8:98 UUIDs: 00001115-0000-1000-8000-00805f9b34fb
[CHG] Device 78:AF:08:BE:E8:98 UUIDs: 0000111e-0000-1000-8000-00805f9b34fb
[CHG] Device 78:AF:08:BE:E8:98 UUIDs: 0000111f-0000-1000-8000-00805f9b34fb
[CHG] Device 78:AF:08:BE:E8:98 UUIDs: 00001200-0000-1000-8000-00805f9b34fb
[CHG] Device 78:AF:08:BE:E8:98 UUIDs: 232e51d8-91ff-4c24-ac0f-9ee055da30a5
[CHG] Device 78:AF:08:BE:E8:98 UUIDs: c7f94713-891e-496a-a0e7-983a0946126e
[CHG] Device 78:AF:08:BE:E8:98 ServicesResolved: yes
[CHG] Device 78:AF:08:BE:E8:98 Paired: yes
Pairing successful
Authorize service
[agent] Authorize service 0000110e-0000-1000-8000-00805f9b34fb (yes/no): yes
[CHG] Device 59:40:F2:34:B7:26 ManufacturerData Key: 0x004c
[CHG] Device 59:40:F2:34:B7:26 ManufacturerData Value:
  01 00 00 00 00 00 00 00 00 00 00 00 00 00 00 20  ...............
  00                                               .
[CHG] Device 49:B4:52:C3:47:3A RSSI: -90
[DEL] Device 5F:7C:48:0A:8D:C5 5F-7C-48-0A-8D-C5
[DEL] Device 44:53:06:E1:0C:46 5fc36c
[CHG] Device 78:AF:08:BE:E8:98 RSSI: -44
[CHG] Device 59:40:F2:34:B7:26 ManufacturerData Key: 0x004c
[CHG] Device 59:40:F2:34:B7:26 ManufacturerData Value:
  01 00 00 00 00 00 00 00 00 00 00 00 00 00 00 20  ...............
  00                                               .
配对并连接成功后,bluetooth上prompt自动变成所连接设备的名称。如下例子为[MIN_PC]#,通过quit命令离开bluetooth控制台,回到原始/bin/bash控制台。
[MIN_PC]# quit
文件传输
需要配置文件传输服务,使用obexd指令,-a标明自动接收文件 -r指定本地接收文件的路径 -n代表日志打在前台。
 root@phyboard-pollux-imx8mp-3:/# /usr/libexec/bluetooth/obexd -a -n -r /home/ &
root@phyboard-pollux-imx8mp-3:/# /usr/libexec/bluetooth/obexd --help
Usage:
  obexd [OPTION?]

Help Options:
  -h, --help                  Show help options

Application Options:
  -d, --debug=DEBUG           Enable debug information output
  -p, --plugin=NAME,...       Specify plugins to load
  -P, --noplugin=NAME,...     Specify plugins not to load
  -n, --nodetach              Run with logging in foreground
  -r, --root=PATH             Specify root folder location. Both absolute and relative can be used, but relative paths are assumed to be relative to user $HOME folder. Default $XDG_CACHE_HOME
  -S, --root-setup=SCRIPT     Root folder setup script
  -l, --symlinks              Allow symlinks leading outside of the root folder
  -c, --capability=FILE       Specify capability file, use '!' mark for scripts
  -a, --auto-accept           Automatically accept push requests
文件接收
配置好之后就可以在MINI_PC端发起文件传输。文件接收到上述obexd服务指定的路径下面。下面的例子是接收到了一个jpg文件。
root@phyboard-pollux-imx8mp-3:/# ls /home
01989a5afd22e9a801209a857591ee.jpg@1280w_1l_2o_100sh.jpg
文件发送
文件发送需要对端开启文件接收服务。需要使用obexctl命令去发送文件。connect成功后通过send命令发送文件到对端。
root@phyboard-pollux-imx8mp-3:/# obexctl
[NEW] Client /org/bluez/obex
[obex]# connect 78:AF:08:BE:E8:98
Attempting to connect to 78:AF:08:BE:E8:98
[NEW] Session /org/bluez/obex/client/session1 [default]
[NEW] ObjectPush /org/bluez/obex/client/session1
Connection successful
[78:AF:08:BE:E8:98]# send /boot/bootenv.txt
Attempting to send /boot/bootenv.txt to /org/bluez/obex/client/session1
[NEW] Transfer /org/bluez/obex/client/session1/transfer1
Transfer /org/bluez/obex/client/session1/transfer1
	Status: queued
	Name: bootenv.txt
	Size: 49
	Filename: /boot/bootenv.txt
	Session: /org/bluez/obex/client/session1
[CHG] Transfer /org/bluez/obex/client/session1/transfer1 Status: complete
[DEL] Transfer /org/bluez/obex/client/session1/transfer1
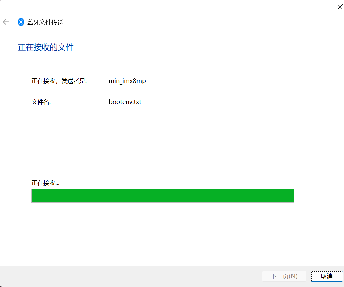
下图为connect成功,但未开始发送文件时对端的状态和发送文件后的状态。

执行disconnect成功后对端接收完成。
[78:AF:08:BE:E8:98]# disconnect
Attempting to disconnect to /org/bluez/obex/client/session0
[DEL] Session /org/bluez/obex/client/session0 [default]
[DEL] ObjectPush /org/bluez/obex/client/session0
Disconnection successful
时钟
系统时钟
systemd 提供了 systemd-timesyncd 客户端,它是一个用于跨网络同步系统时钟的守护服务,是一个开机自启动服务。它实现了一个 SNTP 客户端。与NTP的复杂实现相比,这个服务简单的多,它只专注于从远程服务器查询然后同步到本地时钟。
在/etc/systemd/timesyncd.conf 中配置你的(时间)服务器。systemd-timesyncd只会更改系统时间不会更改rtc时间,可以通过hwclock -w命令将系统时间同步到硬件时间。参考rtc章节。
root@phyboard-cloudtech-imx8mm-1:ntp-units.d# cat /etc/systemd/timesyncd.conf
#  This file is part of systemd.
#
#  systemd is free software; you can redistribute it and/or modify it under the
#  terms of the GNU Lesser General Public License as published by the Free
#  Software Foundation; either version 2.1 of the License, or (at your option)
#  any later version.
#
# Entries in this file show the compile time defaults. Local configuration
# should be created by either modifying this file, or by creating "drop-ins" in
# the system.conf.d/ subdirectory. The latter is generally recommended.
# Defaults can be restored by simply deleting this file and all drop-ins.
#
# See timesyncd.conf(5) for details.

[Time]
#NTP=
#FallbackNTP=time1.google.com time2.google.com time3.google.com time4.google.com
#RootDistanceMaxSec=5
#PollIntervalMinSec=32
#PollIntervalMaxSec=2048
root@phyboard-cloudtech-imx8mm-1:ntp-units.d# systemctl restart  systemd-timesyncd
各参数解释:
NTP=
一个空格分隔的NTP服务器列表, 可以使用主机名,也可以使用IP地址。在运行时, 此处设置的列表将与 systemd-networkd.service中已配置的NTP服务器列表合并在一起。 systemd-timesyncd 将会依次尝试列表中的每个NTP服务器, 直到同步成功为止。 如果为此选项设置一个空字符串, 那么表示清空所有此选项先前已设置的NTP服务器列表。 此选项的默认值为空。
FallbackNTP=
一个空格分隔的NTP服务器列表,用作备用NTP服务器。 可以使用主机名,也可以使用IP地址。 如果所有已配置在 systemd-networkd.service中的NTP服务器以及上述 NTP= 中设置的NTP服务器都尝试失败, 那么将尝试此处设置的备用NTP服务器。 如果为此选项设置一个空字符串, 那么表示清空所有此选项先前已设置的NTP服务器列表。 若未设置此选项, 则使用编译时设置的默认备用NTP服务器。
RootDistanceMaxSec=
最大可接受的"root distance"秒数(最大误差)。 默认值为 5 秒。
PollIntervalMinSec=, PollIntervalMaxSec=
NTP消息的 最小/最大轮询间隔秒数。 PollIntervalMinSec= 必须不小于 16 秒。 PollIntervalMaxSec= 必须大于 PollIntervalMinSec= 。 PollIntervalMinSec= 默认为 32 秒, PollIntervalMaxSec= 默认为 2048 秒。
配置好服务器,公网连接之后就会自动同步时间,可以看到下面的服务状态已经连接上了NTP服务器。
root@phyboard-cloudtech-imx8mm-1:~# systemctl status systemd-timesyncd
* systemd-timesyncd.service - Network Time Synchronization
     Loaded: loaded (/lib/systemd/system/systemd-timesyncd.service; enabled; vendor preset: enabled)
     Active: active (running) since Thu 1970-01-01 00:00:05 UTC; 53 years 7 months ago
       Docs: man:systemd-timesyncd.service(8)
   Main PID: 334 (systemd-timesyn)
     Status: "Initial synchronization to time server 114.118.7.163:123 (ntp.ntsc.ac.cn)."
      Tasks: 2 (limit: 1605)
     Memory: 840.0K
     CGroup: /system.slice/systemd-timesyncd.service
             `-334 /lib/systemd/systemd-timesyncd

Jan 01 00:00:05 phyboard-cloudtech-imx8mm-1 systemd[1]: Starting Network Time Synchronization...
Jan 01 00:00:05 phyboard-cloudtech-imx8mm-1 systemd[1]: Started Network Time Synchronization.
Jan 01 00:03:49 phyboard-cloudtech-imx8mm-1 systemd-timesyncd[334]: Network configuration changed, trying to establish connection.
Aug 25 07:10:21 phyboard-cloudtech-imx8mm-1 systemd-timesyncd[334]: Initial synchronization to time server 114.118.7.163:123 (ntp.ntsc.ac.cn).
通过date查询已经和当前时间同步。
root@phyboard-cloudtech-imx8mm-1:~# date
Fri Aug 25 15:13:39 CST 2023
设置时区:掉电保存
ln -sf /usr/share/zoneinfo/Asia/Shanghai /etc/localtime
Overview
Content Tools
Tasks
support@phytec.cn![]()
热线:0755-61802110-803